Help Article
Form Designer

Who can use this feature?
By default, users with Admin role permissions
Purpose
Form Designer lets you create and configure the forms your organization uses in the field, lab, and quality control. With this tool, you control which fields appear on each form, define workflows, and customize behavior. The same interface is used for Activity, Sample Tracking, and Lab Test forms, though available options may vary depending on the type of form you’re working with. You can also launch Report Designer from within Form Designer to design reports for your custom forms.
Check these pages for more specifics on Form Designer topics:
Accessing Form Designer
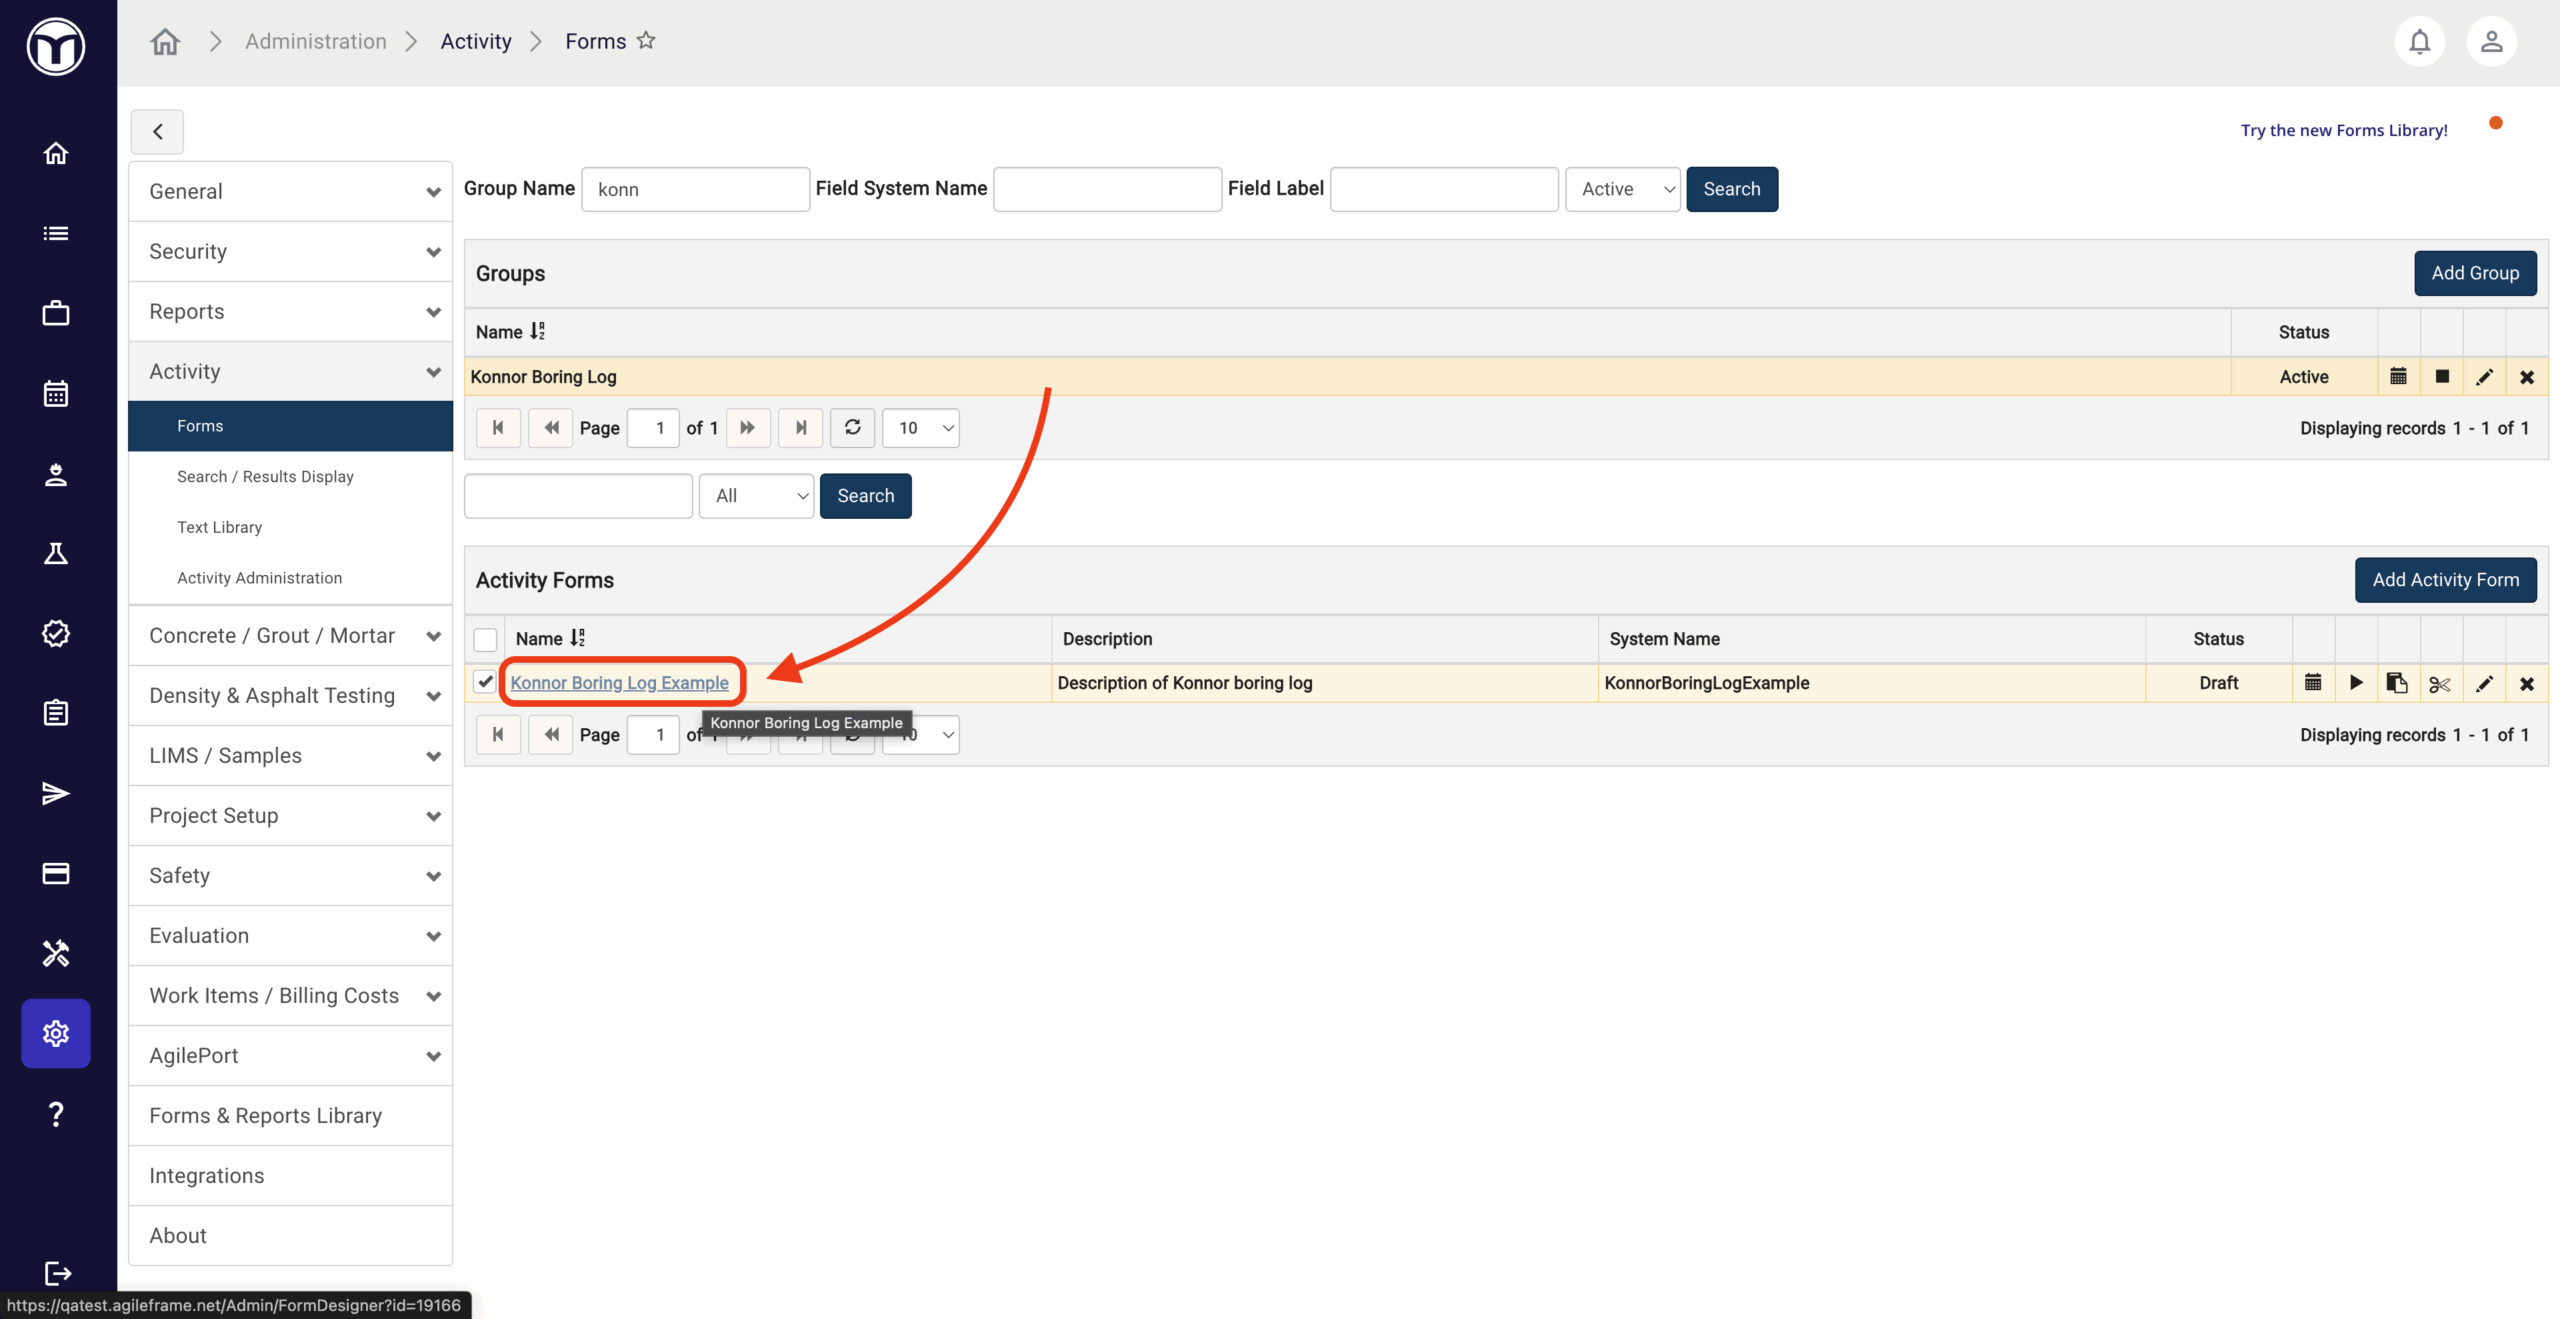
To open a form in Form Designer, enter the Admin module then navigate to the page containing that form type, such as:
- Activity → Forms
- LIMS / Samples → Sample Forms
- LIMS / Samples → Test Forms
From these pages, simply click the hyperlinked name of the form to open it in Form Designer.
Predefined Forms
Some forms come preconfigured and can’t be fully edited. In these cases, certain controls, like adding fields or changing field settings, are restricted to protect the form’s structure and data. Forms you build yourself are fully editable, letting you customize them to fit your business needs.
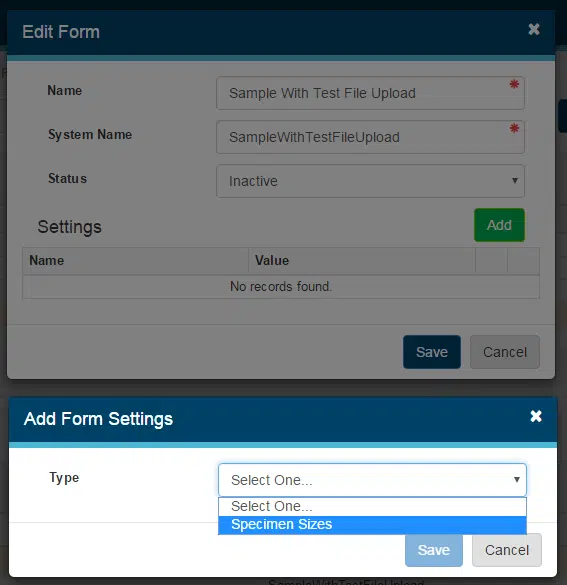
Form Settings
Forms may include optional settings. For example, a Sample form can define which specimen sizes apply, so only relevant options show to users. You can also link Test forms to Sample forms. Access these settings from the button bar after selecting a form to edit.
Here's a list of settings names and descriptions for various form types:
Activity Forms
| Activity Category | Assigns an Activity Category to the form. Used in the Forms Store and Forms Library to display the form under its Category. Primarily for internal use. |
| Allow WBS | (Work Breakdown Structure) Enables WBS levels within the Billing Cost section of DIY forms. If Require WBS is checked, at least the first WBS level must be entered before saving the form. |
| Batch Data Entry | Configures the grid columns used when entering data for multiple similar forms at once. Data grid fields are not supported. Expression evaluations require all fields to be part of the batch grid. Parent form fields cannot be referenced. Fields not included in the batch setup will not appear on the form record. |
| Capture Costs | Enables the ability to record field costs associated with the form record. Form-specific costs can be added once this setting is enabled. |
| Dashboard – Behaves Like Discrete | Controls how the form appears on the Home Screen. Not applied: Form appears in the Activity PM tile. Applied: Form appears in the Field Testing or Lab Testing tiles. |
| Density Test – Bituminous Nuclear Gauge | Adds system fields needed to perform a BNG density test on an Activity form. |
| Density Test – Sand Cone | Adds system fields needed to perform a Sand Cone density test on an Activity form. |
| Density Test – Soil Nuclear Gauge | Adds system fields needed to perform an SNG density test on an Activity form. |
| Geotechnical – Boring Log | Adds system fields for Boring Log forms. |
| Prevent Edits in Field Complete or Review Status | Prevents technicians from editing a form once a PM or authorized user marks it as Complete or Review. |
| Private Provider Inspections | Adds system fields to the form for Private Provider Inspections. |
| QC Search Results | Configures the form-specific columns displayed when filtering a QC grid to a specific form. |
| Subcategory | Assigns a Subcategory to the form. Used in the Forms Store and Forms Library to display the form under Subcategory. Primarily for internal use. |
| Unit System | Assigns a unit system (Imperial or Metric) to the form and ensures the correct specification values are applied. |
Sample Forms
| Allow WBS | (Work Breakdown Structure) Enables WBS levels in the Billing Cost section of DIY forms. If Require WBS is checked, at least the first WBS level must be entered before saving. |
| Bypass LIMS Test Assignment | Skips the “Tests to Assignment” workflow step in Lab (LIMS) queues. Can also be set at the Sample Type level with the CGM Sample Specification form setting. |
| Capture Costs | Enables the ability to record field costs associated with the form record. Form-specific costs can be added once enabled. |
| CGM Default Test | Sets the default test form shown in the Lab Instructions data grid. Users only see/select tests where the test material matches the sample form material. |
| CGM Sample Specification | Requires the user to pick a CGM Sample Type. Automatically creates input fields for Location, Supplier, Plant, and Mix Design, and adds a specification section with CGM-specific fields based on the sample type. |
| Dashboard – Behaves Like Discrete | Controls how the form appears on the Home Screen. Not applied: Form shows in the Activity PM tile. Applied: Form shows in the Field Testing or Lab Testing tiles. |
| Geotechnical – Boring Sample | Adds system fields for Boring Sample forms. |
| Hide Scheduling Prompt | Removes the scheduling prompt shown after saving a sample form. Always Answer “Yes”: Form is automatically added to Scheduling. Always Answer “No”: Form is not added to Scheduling. |
| LIMS Search Results | Defines which columns appear in Lab (LIMS) when processing a Sample Form. |
| One Specimen Sample | Forces the sample to allow only one specimen. |
| Prevent Edits in Field – 1+ Specimens Checked In | Prevents Field users from editing a sample once one or more specimens are checked in. |
| Specimen Sizes | Controls which specimen sizes can be used with a sample form. One or more specimen sizes can be assigned; if unused, all sizes are available. |
| Subcategory | Assigns a Subcategory to the form. Used in the Forms Store and Forms Library to display the form under Subcategory. Primarily for internal use. |
| Sample Material | Associates the sample form with a material. |
| Turn Off Specimen Retrieval | Disables the Scheduling system’s prompt to schedule a future specimen retrieval. |
| Unit System | Assigns a unit system (Imperial or Metric) to the form and ensures the correct specification values are applied. |
| QC Search Results | Defines which columns display in Review (QC) grids when filtering to a specific form. |
Test Forms
| Test Material | Associates the test form with one or more materials. |
| Allow WBS | (Work Breakdown Structure) Enables WBS levels in the Billing Cost section of DIY forms. If Require WBS is checked, at least the first WBS level must be entered before saving. Default WBS from Sample: When selected, the test form will auto-populate with the associated sample’s WBS values. Users can still edit the WBS values in the test form. |
| Batch Data Entry | Configures grid columns for batch data entry across multiple (similar) forms. Data Grid fields are not supported in batch entry. Expression evaluation requires all fields to be part of the batch grid. Fields on a “parent” form are not supported. Fields not part of the batch configuration will not be created in the record. |
| Billing Code | Default billing code for the test. |
| Billing Quantity | Default billing quantity for the test. |
| Capture Costs | Enables the ability to record lab costs associated with the test form. Form-specific costs can be added once enabled. |
| Cost | Default billed cost for executing the test. |
| LIMS – Post-Test Search Results | Defines which columns appear in the Testable and To Test queues in LIMS. |
| LIMS – Pre-Test Search Results | Defines which columns appear in the To Review and Done queues in LIMS. |
| Material Specification | Associates the test form with one or more material specifications. |
| Remove Specification Limit Operators from Reports | Simplifies how specification ranges display in reports. Example: Normal: >=65 – <90With setting applied: 65 – 90 |
| Standard | Default standard for the test (e.g., ASTM standard number). |
| Subcategory | Assigns a Subcategory to the form. Used in the Forms Store and Forms Library to display the form under Subcategory. Primarily for internal use. |
| Test Default Specimen Size | Specifies the default specimen size for the test, applied during the test assignment process. |
| Test Duration | Specifies the default duration (in days) required to complete the test. |
| Test List | Allows creation of a custom test list report that replaces the default Print Early Test List in LIMS. Useful for technicians who want a partially completed report to take notes on during testing. Create a report linked to the test form. In report settings, toggle Test List Report on. In form settings, select the report. When using Print Test List in the Lab Module, the custom report will print. |
Evaluation & Safety Forms
| Batch Data Entry | Configures the grid columns presented when doing batch data entry for multiple (like) forms Data Grid fields are not supported with the batch Data Entry feature. These fields should not be added when configuring this feature on a form. Any expression evaluation will require all fields to be part of the data grid Using / evaluating fields on a "parent" form is not supported Any fields not part of the batch configuration will not be created on the form record |
| QC Search Results | Defines which columns display in Review (QC) grids when filtering to a specific form. |
Adding New Form Fields
To add a new Form field, choose the Form and select Add Field. You will then need to set the various parameters for your Field.
Field Parameters
| Label (Required) | The display name for your field in Field, Quality Control, or reports. |
| Type (Required) | Specifies the field type, chosen from a drop-down list. Once saved, the field type cannot be changed. |
| System Name | The system identifier for the field. Must be unique within the form (but can be reused across different forms). Used by the system for search and results display. Only letters and numbers are allowed (no spaces). Auto-suggested based on the Label, but can be edited. |
| Is Required | Makes the field mandatory when entering data. |
| Use as Placeholder | Allows the field to be used as a dynamic placeholder, such as in default report descriptions or other form-based areas. |
| Settings | Displays options based on the selected field type. For Multiple Choice or Pick List fields, a Reorder Options button appears once two or more options are added. By default, options appear alphabetically. Use the button to customize the order. For more details, see Form Designer – Field Settings. |
| Rules | Defines logic and conditions that apply to the field. Rules depend on the field type. For details, see Form Designer – Expression Builder. |
Field Types
| Chart | Generates a proctor curve chart with an optional zero air voids line. Based on a data grid data source. |
| Chart – Scatter Plot | Generates a scatter plot chart. Trendline options can be defined. Supports logarithmic or linear X scales. Based on a data grid data source. |
| Data Grid | A container for multiple fields displayed in a tabular grid. Users can add multiple entries; each entry represents a record (row) on the report. Fields in the grid represent report columns. Large numbers of fields or complex constructions may slow form load or report generation. If performance issues occur, reduce the number of fields in the grid. |
| Date | Presents a date field with a date picker. |
| Information | Displays a colored box with text for instructions, reminders, warnings, etc. Box color can be set (green, blue, orange, red). Use the Default Value property to define the text. |
| Lat / Long | Captures the device’s latitude and longitude. Can be used as a standalone control or inside a data grid. |
| Multiple Choice | Presents a list of values for selection. Allows multiple selections. Useful for site checklists or multiple-condition disclosures. |
| Number | Presents a numeric field. Decimal places can be defined. |
| Pick List | Presents a list of values for selection. Allows only one selection. Values can be hidden/inactivated if no longer applicable. Values cannot be deleted if used on a record. Avoid double quotes when adding options; this may cause issues in visualizations or calculations. |
| Section | A container for other fields, similar to a data grid. Displays as a separate screen (Field) or grouping (Quality Control). Fields in a section can be included in an Activity Report like any other form field. Supports grids and nested data grids. |
| Text Area | Provides a multi-line text input (numbers, letters, symbols, etc.). Maximum character length can be defined. Text can be formatted; apply formatting directly in the field or use plain text sources (e.g., Notepad). For repetitive text, use MetaField text libraries. |
| Text Box | Provides a single-line text input (numbers, letters, symbols, etc.). Maximum character length can be defined. |
| Time | Presents a time field with a time picker. |
| Upload | Allows image upload. Maximum file size: 25 MB. |
| Yes / No | Presents a simple Yes / No selection. |
| Fraction | Provides an optional whole number field plus required numerator and denominator fields. Mixed fractions can be used in calculations, but results are not automatically simplified. |
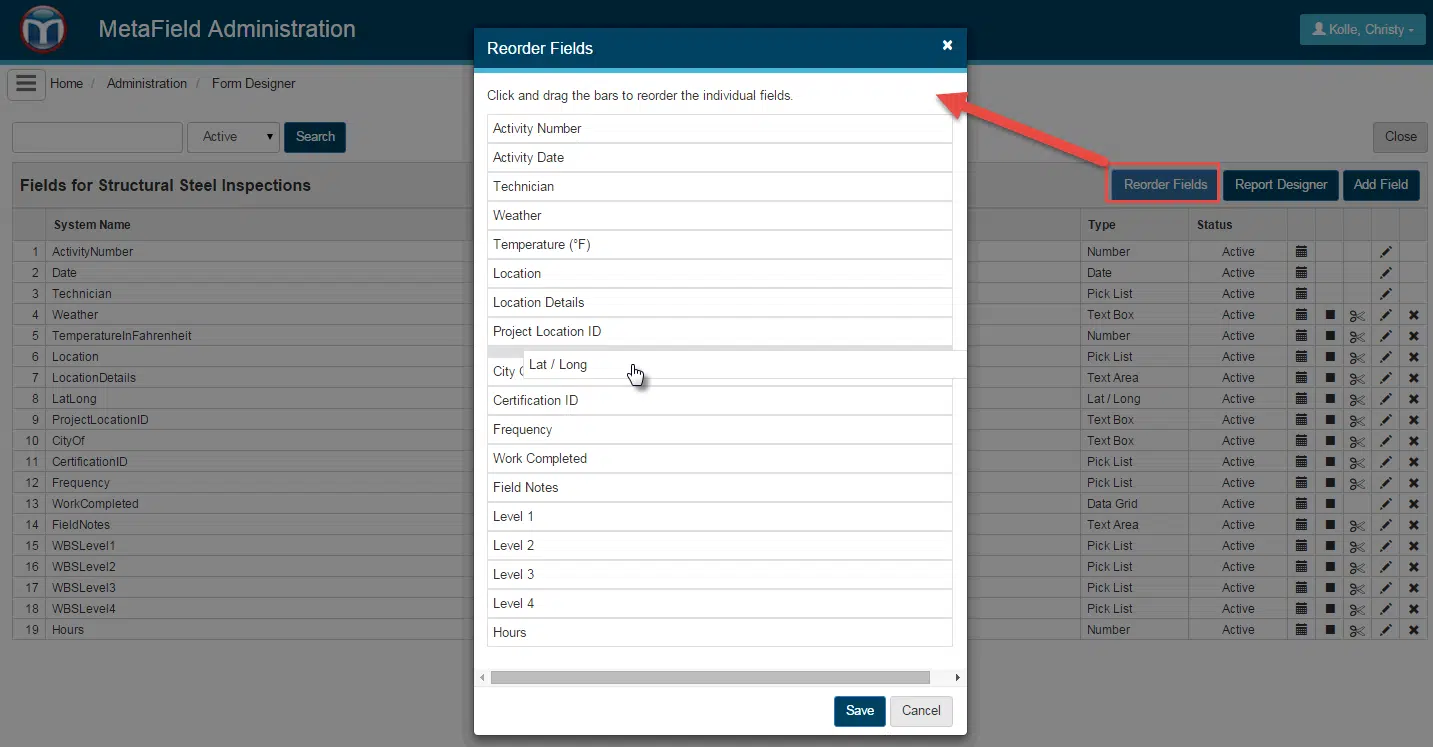
Reordering Form Fields
The order in which fields appear on the Form Designer tab determines how they are presented to users in Field, Lab, or Quality Control. To change the order, click the Reorder Fields button and drag each field into its new position. This allows you to control the flow of data entry and ensure fields are displayed in the most logical order for users.
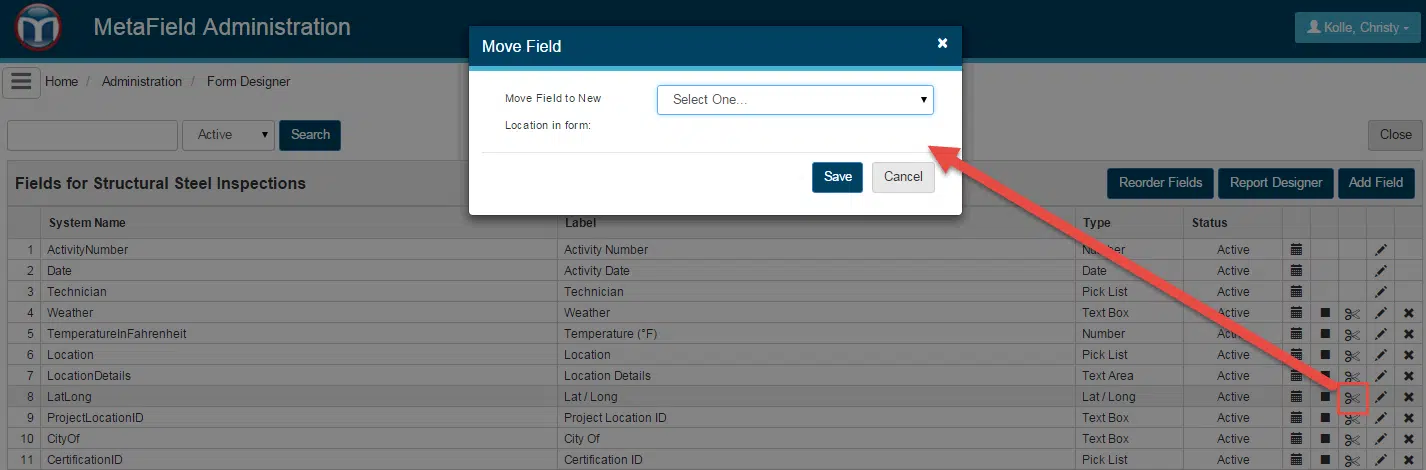
Moving Fields to a New Location in Form
Fields can be moved between the Main Form, Data Grids, and Sections. Sections or Data Grids can also be moved within the form. A field can only be moved if it has not already been used on a record. To move a field, click the move icon next to it and then select the location where you want it placed. This flexibility helps you organize forms efficiently as your data entry needs evolve.
Creating and Accessing Reports
For Activity and Lab Test forms, a Report Designer button is available. Clicking this button lets you access all reports that use the form or add a new report. This centralized access makes it easy to manage reporting for your forms and ensures that all data collected can be analyzed or exported as needed.
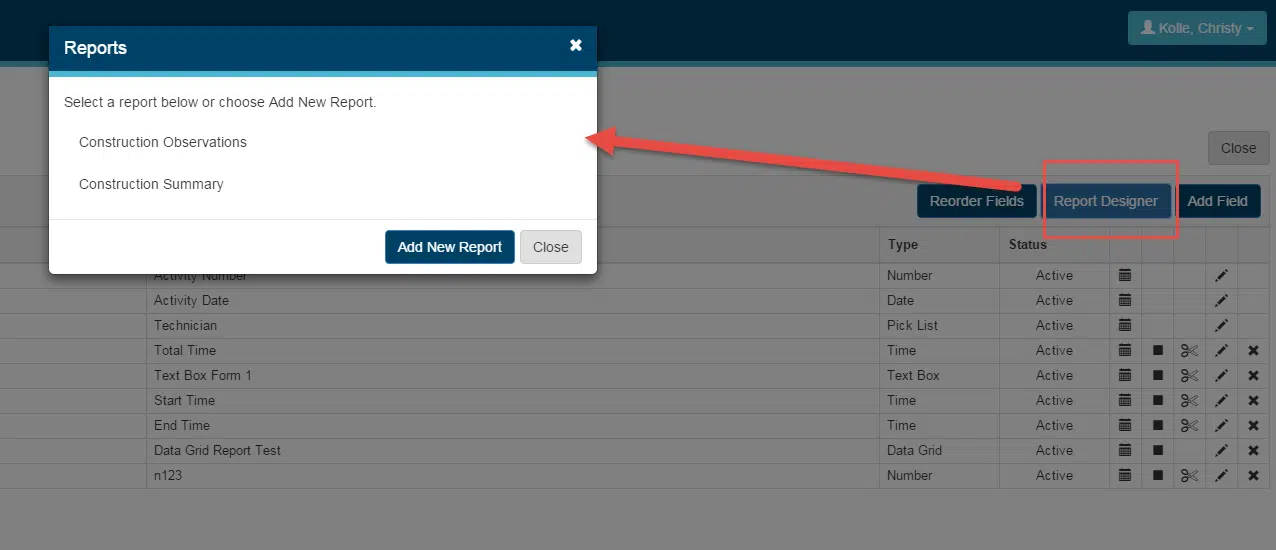
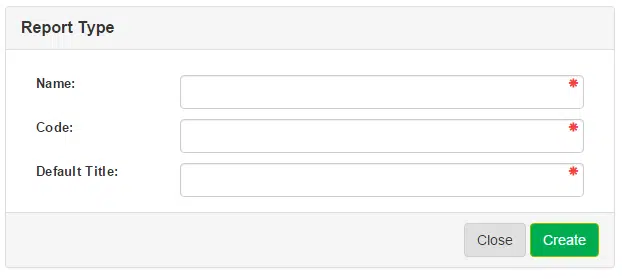
Creating a New Report
When adding a new report, click Add New Report and enter the required information: Report Name, Code, and Default Title. Once these details are provided, you will enter the Report Designer, where you can configure the report layout, select fields, and define any additional settings.
Copying Forms
Forms can be duplicated, including their underlying report templates. When copying a form, you have the option to include or exclude inactive fields. This feature is useful for creating new forms based on existing structures without starting from scratch, while giving you control over which fields to carry over.


Form Designer Tips and Tricks
| 1) Add a picklist field and include your various options In this example, we want to provide a way for a technician to type in an alternative, if their specific option is not available in the picklist: Options added to picklist: A, B, C, D, and Other. If the technician chooses "Other", we want to open a text box. | 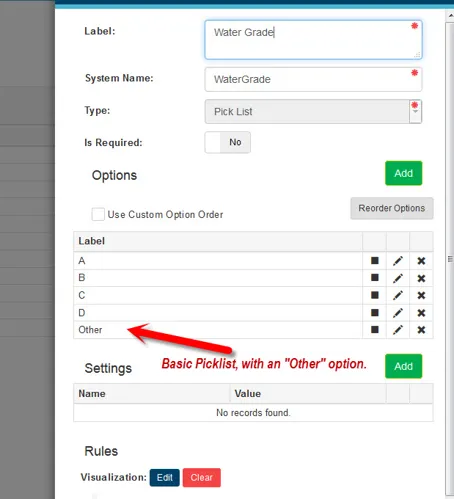 |
| 2) Add a Text Area or Text Box field In this example, the text area is simply called, "If Other, Please Explain". This will allow the technician to describe the option of "Other", if they choose "Other" in the picklist. On this field, we will need to add a CONTAIN visualization rule that evaluates the picklist field, and if the "Other" option was chosen. If the "Other" option was chosen in the picklist, this text area / text box field will display to the user. If any other option is chosen, this field will remain hidden. | 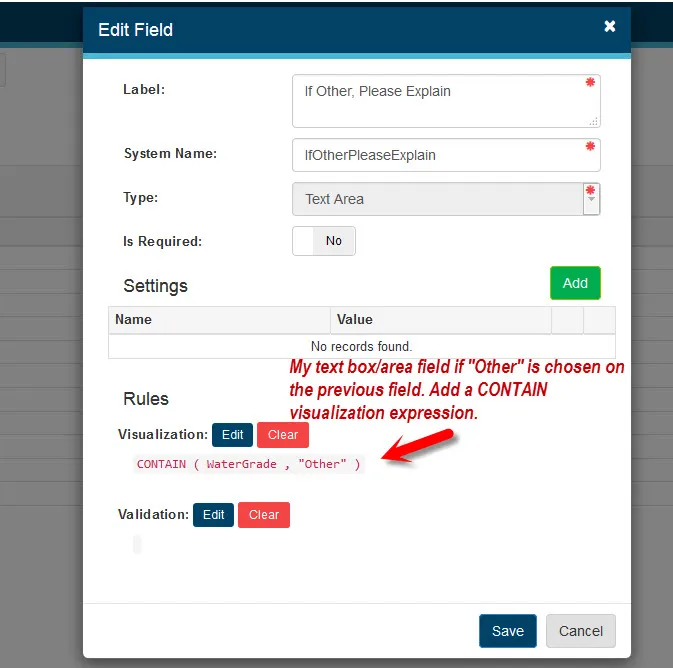 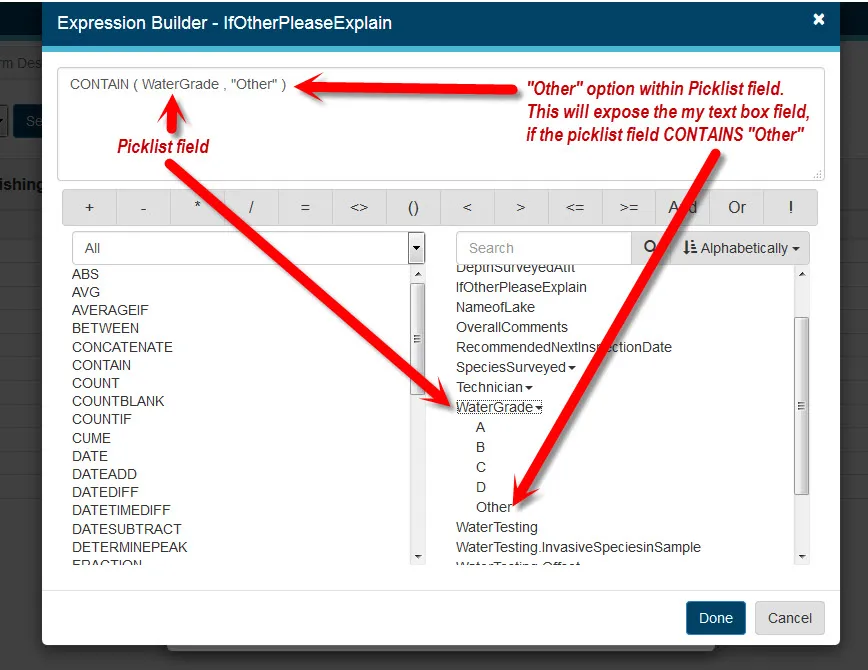 |
Want to keep learning?
Click here for more how-to articles and MetaField guides. You can also access in-app guidance using the Help Desk!