Help Article
General

Who can use this feature?
Users with Admin - General permissions
Purpose
The Admin > General section lets you configure general settings that apply across the platform. This section is split into various pages, detailed below.

Most Admin > General pages are used to add, edit, or manage different types of records (locations, offices, materials, etc.). Each record has a set of buttons in its row, which you can use to perform quick actions on it:

- View record history (📅)
- Activate or deactivate the record (▶️/◼️)
- Edit the record (✏️)
- Reassign the record (🔧)
- Delete the record (✖️)
Click on an area below for additional info:
- Settings: Apply general settings (timezone, sort order, date format, etc.)
- Generic Users: Add users who lack system access
- Locations: Manage locations for use in MetaField
- Jurisdictions: Add jurisdictions & inspection types
- Departments: Add & edit departments
- Regions: Add & manage regions
- Offices: Add & manage offices
- WBS: Create & assign Work Breakdown Structure to tests, activities, etc.
- Certifications: Manage & assign user certifications
- Data Sources (Basic & Dimensional): define simple or dimensional value lists to use across form definitions
- Material: Add & manage materials used in sample/testing processes
- Suppliers / Mix Designs: Manage Suppliers, Plants and Mix Design lists
- Global Documents: Add docs shared across projects (testing procedures, etc.)
- Integrations: Configure settings tied to product integrations
Settings
Settings allows you to set or adjust your default global settings, including:
- Logo shown on reports (Reports Logo Content)
- Sort order across record lists (descending vs. ascending)
- Display name structure shown on reports
- Default timezone
Note: Most default settings can be adjusted per project as needed, so don’t worry if your default configuration isn’t a perfect match for all projects.
Generic Users
Generic Users lets you add and manage non-system users. (I.e., entities involved in projects who are not named users in the system.) Here are some examples of generic users you might add:
- Contractors
- Subcontractors
- Suppliers
- Inspectors
- Clients
Use this page to add new generic users to your system – and include or omit them from Field Tech & Lab Tech picklists.
Locations
Locations lets you create and manage a list of Locations for use across MetaField. Once added, these locations can be selected across soil tests, concrete pours, and various other activities logged in the system. For example:
- Building Interior – Footing
- Building Exterior – Column
- Base Fill - Pavement
Adding these pre-defined locations enables faster data entry for teams on mobile devices – and predictable metadata for analytics use.
Use the checkboxes on each location row to include or omit its use across different areas (Activity, Concrete, Field Density Test, etc.)
Jurisdictions
Jurisdictions enables you to add Jurisdictions and Inspection Types. Once added, these records can be assigned to forms and activities in MetaField.
Use this page to quickly add and define jurisdictions or inspection types used by your firm, and make those records available for use across the system.
Departments
Departments lets you create and manage a simple list of your firm’s department names. Once added, departments can be assigned to your users in Admin > Security > Users, under their General Info.
Assigning departments to your users makes it easy to organize and filter them by department. This is especially helpful when managing your user security settings.
Regions
Regions allows you to add and manage a list of regions related to your projects. Once added, you can click the Edit icon (✏️) to set a default unit of measurement – or press Add Office assign offices to the region.
From the Add Offices screen, select the offices you want from the Available Columns list. Then use the arrow button (>) to move your offices into the Selected Columns list. Once finished, press Save. Then press Save again to finish editing your region.
Once configured, regions can be used to predict and filter system information, and to organize your customers by region.
Note: For details on adding a new office for region selection, check the Offices section just below.
Offices
Use Offices to create and manage a list of your firm’s offices. These office records are used across many parts of the system, including:
- Assigning users to offices in Admin > Security > Users
- Assigning a project’s Owning Office in Projects > Specifications
- Selecting office locations on client reports in Deliver
To add a new office, press the Add Office button and enter any required fields (Office Name, Address, etc.). Once added and activated, the new office will be available for selection on this page and across the app.
When adding or editing an office, you can also configure notifications about expiring certifications for technicians assigned to an office. These notification emails will be sent to any assigned users under the Certification Managers field.

WBS (Work Breakdown Structure)
The WBS page lets you map out a Work Breakdown Structure – and assign it to different tests, samples, and activities. This WBS data will also be available as a field option in all data exports in the Extracts module.
You can map up to four WBS levels to business-friendly names. Unused levels can be deactivated using the controls on the right of the WBS grid. The mapped names will appear as field names when assigning a WBS to a test, sample, or activity.
Certifications (Certs)
The Certifications page allows you to add, manage, and assign certifications to your users. These certs are used in Field > Activity and the Schedule module. This page is split into two different tabs, Certified Personnel and Certification:
Use the Certified Personnel tab to add, edit, and manage your list of users with certifications. You can also bulk extract users or upload new users to this page via .CSV file.
Use the Certification page to add and manage certs. To add a new certification, press the Add Certification button, then add its name and description. You can also use the buttons in each row to activate, edit, or delete certs.
Data Sources & Data Sources – Dimensional
Data Sources let you define a set of values once and reuse them across multiple form definitions. For example, instead of re-entering the list of third-party drillers in every form, you can create a single Driller Data Source and keep it up to date in one place. This prevents errors and keeps data consistent as things change.
There are two types of Data Sources:
Simple Data Sources: A straightforward list of values, managed from the Data Sources page. These are best for global options used on Activity and Sample Tracking forms. From this page you can add a new Data Source, then manage its options directly in the table or by importing a .CSV file.
Dimensional Data Sources: Designed for more complex data structures, managed from the Data Sources – Dimensional page. These act like database tables, where each record can include multiple properties. To create one, press Add Data Source, give it a name and description, then add columns as needed before saving. These sources define how lookup tables work on your test forms.
Material
The Material page shows a list of materials used for your sampling and testing processes in the Field and Lab modules. Some materials on this list are pre-loaded by default.
You can add new materials to this list with the Add Material button. Once added, this material can be selected on sampling and testing forms.
Suppliers / Mix Designs
Suppliers / Mix Designs is a page for maintaining lists of suppliers, plants, and mix designs. All plants and mix designs are assigned to a supplier. Use the Add button in the top-right of each list to create new entries:
- For new Suppliers, simply enter their name
- For new Mix Designs, enter a name, material, and optional strength (psi) value
- For new Plants, enter a name and any material(s) that plant produces
You can also import suppliers, plants, and mix designs from a .CSV file. Simply press the Import button in the top-right of each list.
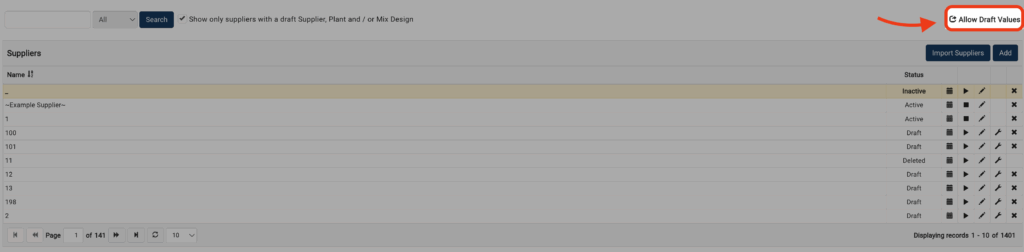
Reviewing Drafted Records:
Field staff can manually enter new suppliers, plants, and mix designs while completing Field data entry. These records will appear on the Suppliers / Mix Designs page in Draft status. From this page, you can review drafted records and activate them (▶ button), making them available for selection in Field pick lists.
It’s useful to regularly review these drafted records and enable them for Field selection. Doing so helps prevent duplicate or incorrect manual entries by allowing Field staff to select them via pick list.
How to Review Drafted Records
- Filter Draft Records – Use the “Show only suppliers with a draft” checkbox to view draft suppliers, plants, or mix designs.
- Review & Activate – Click on a supplier to see any associated draft plants or mix designs, then activate records using the Activate button (▶).
- Use the Dashboard – Identify draft records linked to concrete samples or bituminous density tests.
- Batch Reassignment – If needed, use the Reassign button (🔧) to reassign multiple draft values to an approved entry in bulk. Be cautious when reassigning suppliers, as plants and mix designs are linked to them.
Prohibiting Entry of Draft Values
To prevent field technicians from entering draft values, restrictions can be applied at the supplier, mix design, or material type level. Adjust these settings by modifying the Allow Draft Values option as needed.
Global Documents
The Global Documents page is a simple repository for documents you want to show across your Field projects. This is a perfect area to upload testing procedures, sampling procedures, company-wide standards, etc.
Managing Global Documents:
Documents are organized into Document Groups (folders). To add one, click Add Document Group and name it. Groups can be edited or deleted as needed.
To upload a document, select an existing group and click Add Document, then provide a description. Documents can be files (.PDF, .DOC) or URLs and may be linked to specific Field Areas for relevant visibility. Use the Preview or Download buttons to view files.
Integrations
The Integrations page lets you configure settings for product integrations, including defining default data for integration tasks. This page is primarily used to manage and adjust Forney integrations.
Forney Integrations:
Forney integration enables the transfer of Cast Cylinder data between Forney and MetaField. When retrieving data, you can choose how to populate these test records in MetaField:
- Use Forney API data
- Apply a default value if no data is available (e.g., Capping Method)
- Leave the field blank if no data or default value is set (e.g., Height)
Want to keep learning?
Click here for more how-to articles and MetaField guides. You can also access in-app guidance using the Help Desk!