Help Article
Overview - Schedule

Who can use this feature?
By default, users with the Scheduling > Create/Modify Schedule permission.
Purpose
Schedule is where all work begins in MetaField. This module allows users in the scheduling role to:
- Efficiently schedule required field work
- Assign work orders to field technicians
- Seamlessly coordinate work with field staff

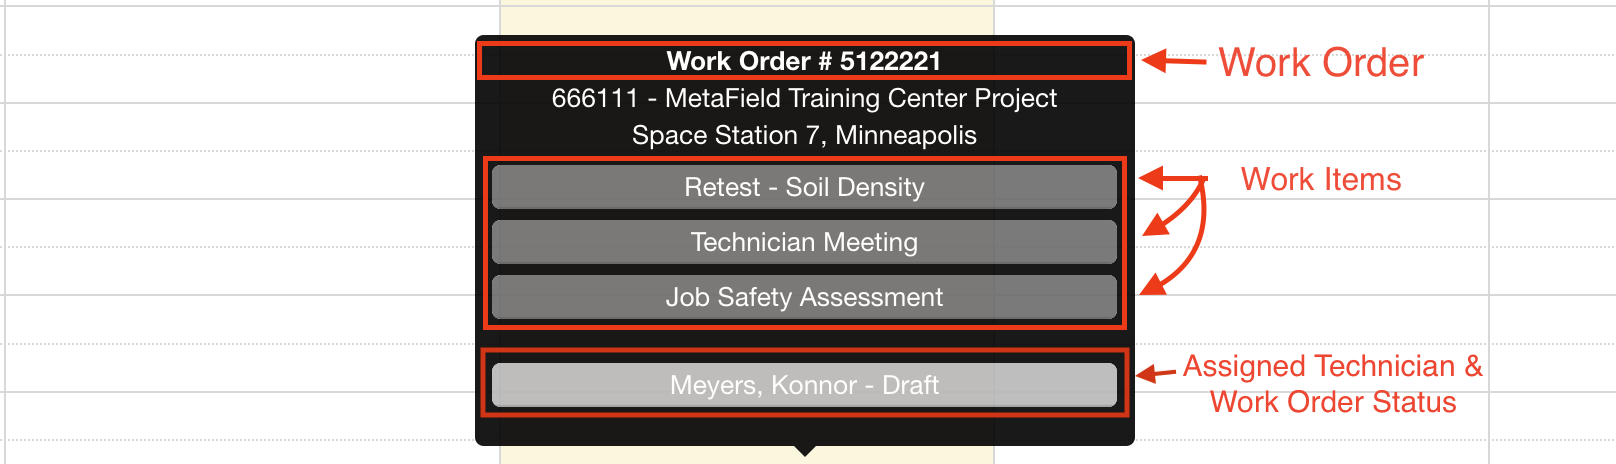
What Are Work Orders?
Work orders are assignments comprised of one or more individual work items, like a soil density retest or safety assessment. Your goal as a scheduler is to create these work orders, then assign them to your field technicians. Once assigned, field techs will receive a notification to review, accept, and complete the work order as instructed.
Permissions in Schedule
Your MetaField administrator must grant you permission to access Schedule. This module has two permission levels:
- Level 1: Permission to view all work orders
- Level 2: Permission to view, modify, and create work orders
If you have access to the Schedule module but can't create or modify work orders as needed, contact your administrator for support.
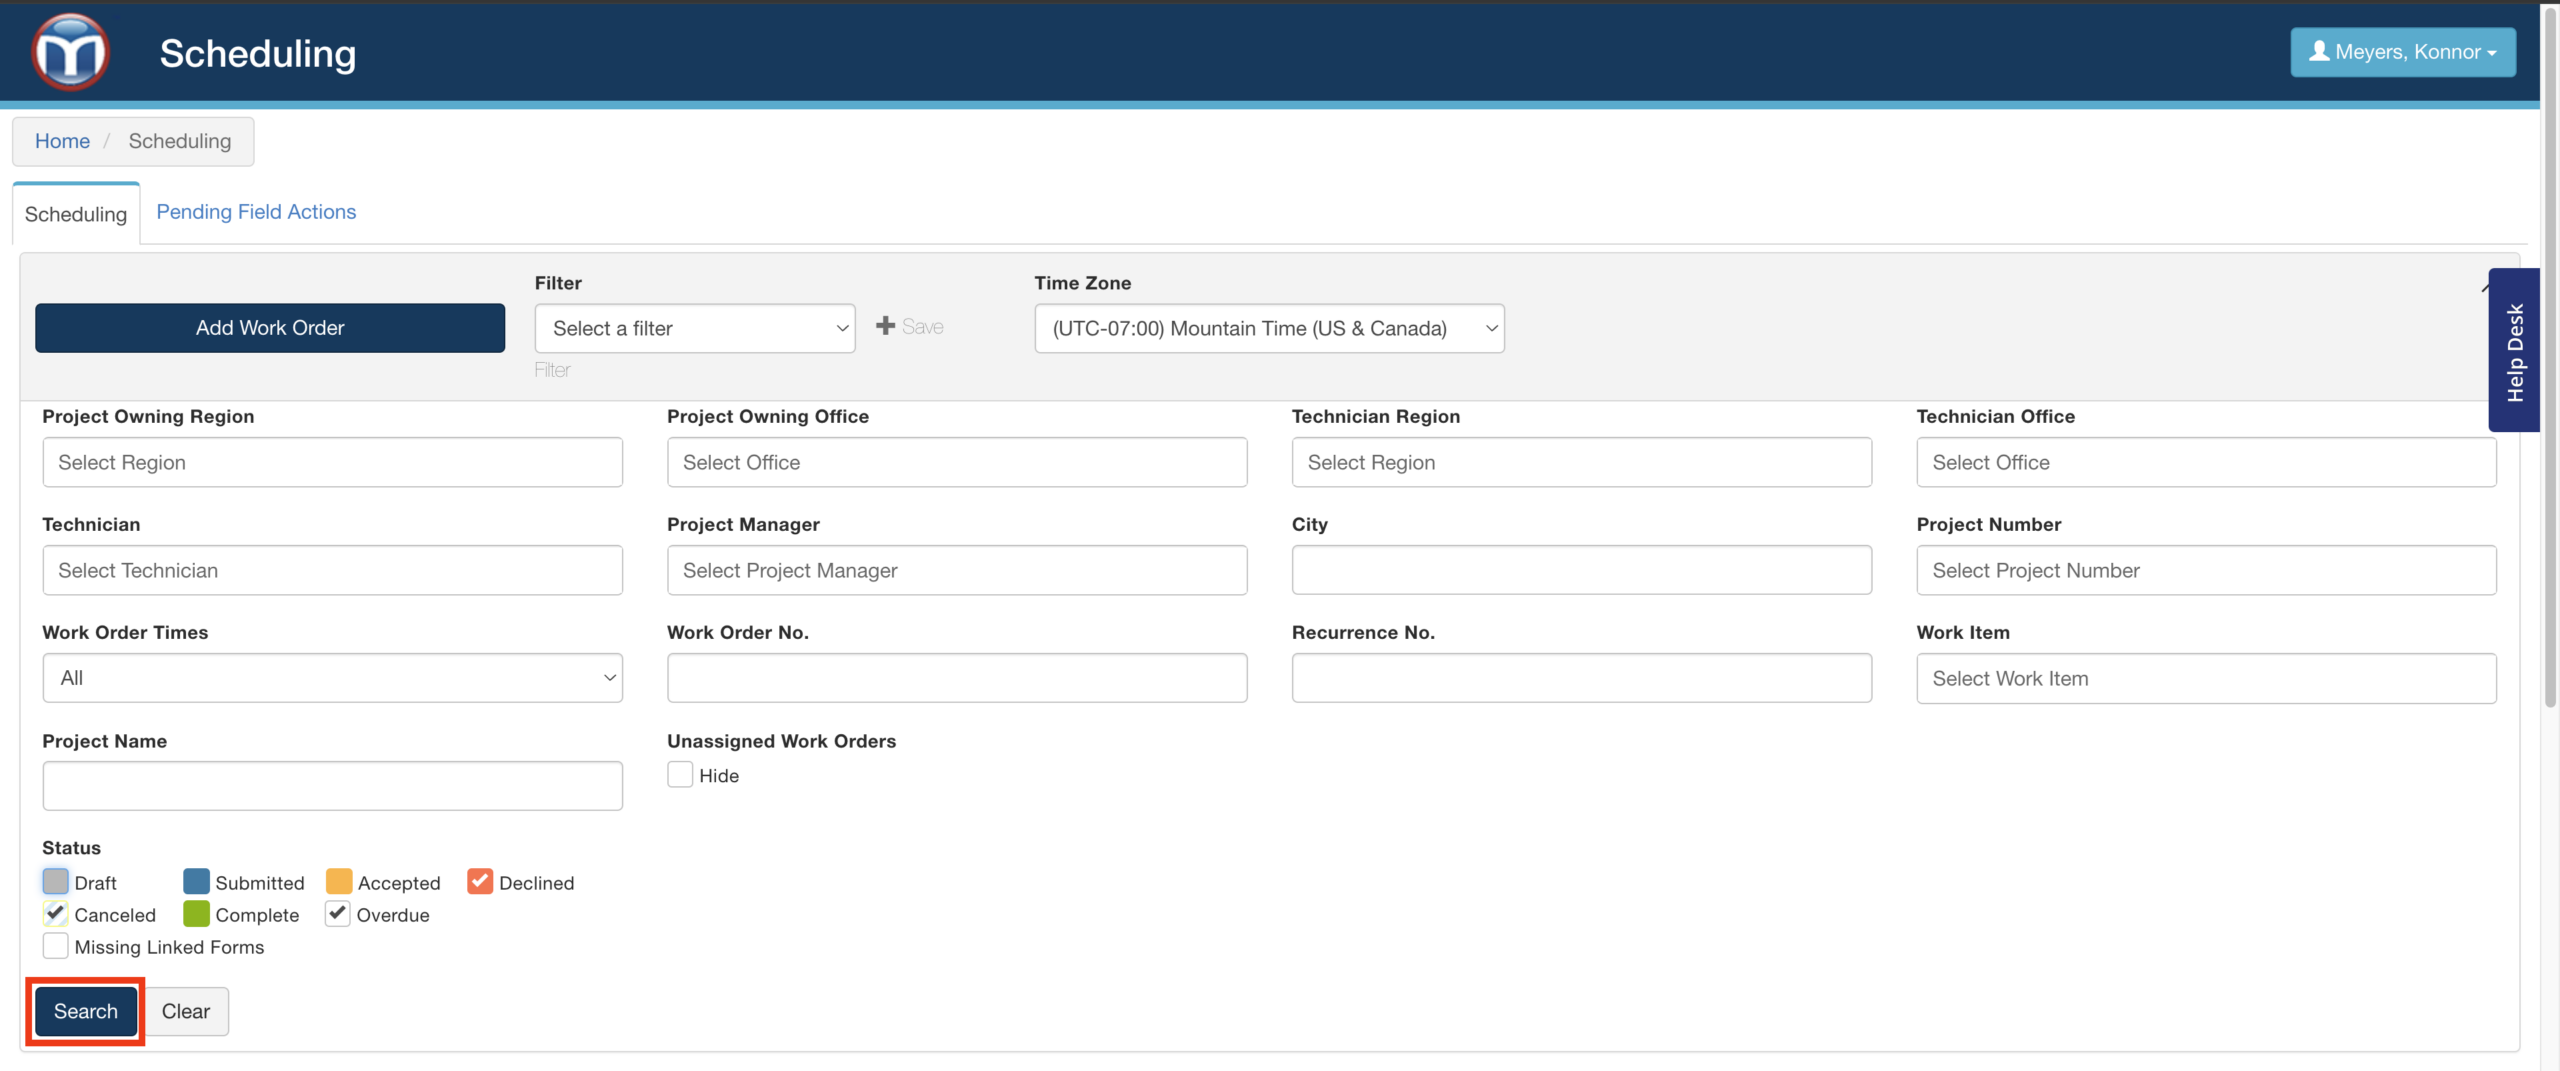
Schedule: Filter Panel
The filtering panel will help you quickly find existing work orders. You can use one or more criteria to narrow the list (like work order status, assigned technician, or project number). Click Search to apply your filter options - or reset them using the Clear button beside it.
Saving Filters
You can save your current filter options using the + Save button pictured below.
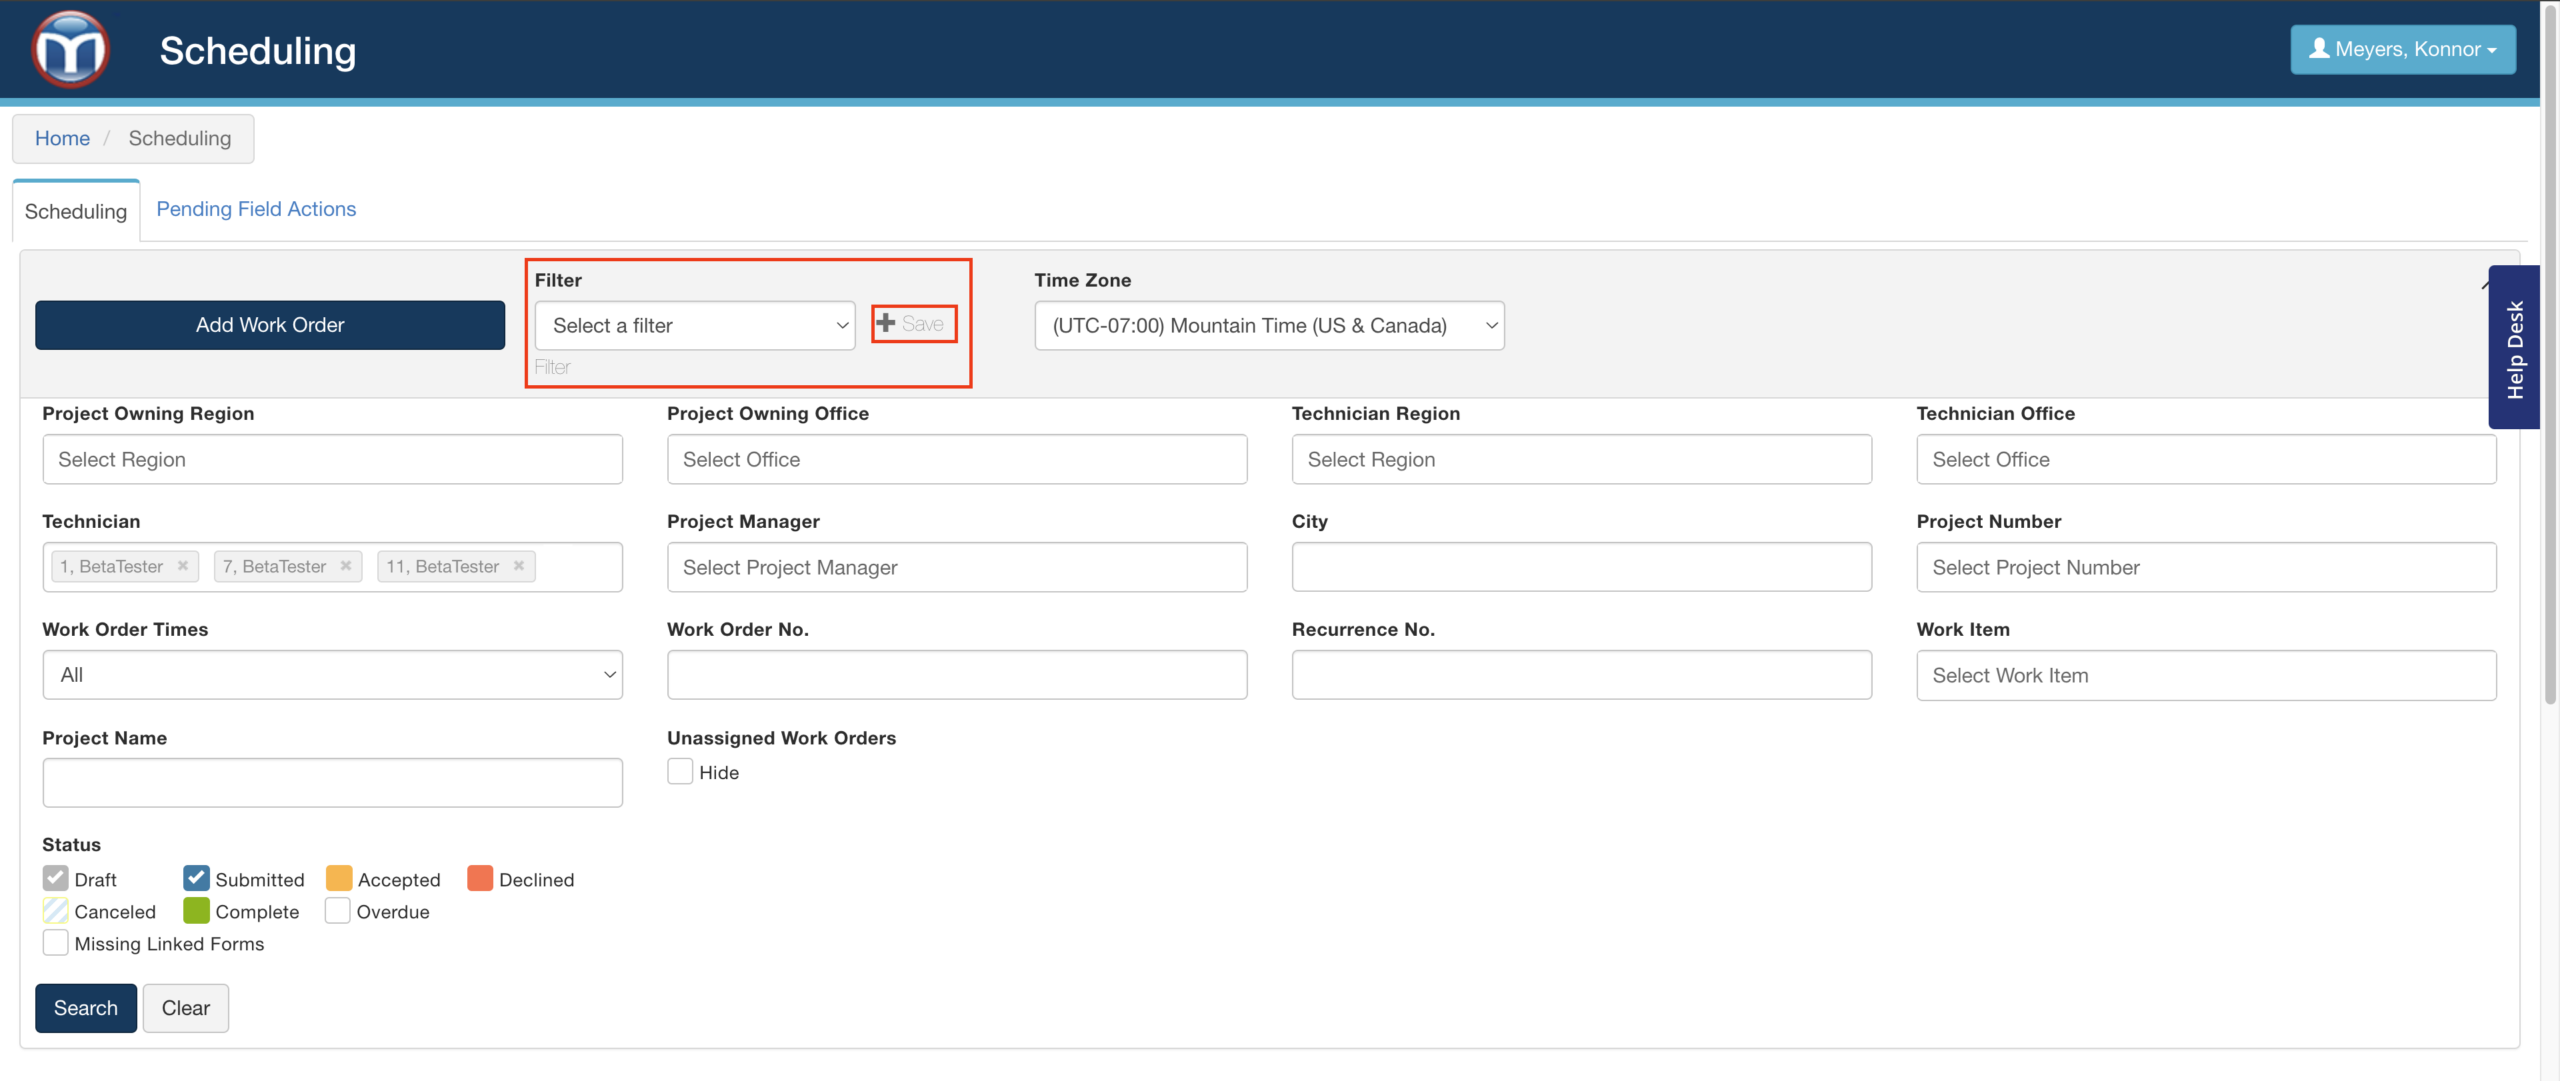
Saved filters are a great way to repeat frequent searches without having to re-enter all your options. For example, you might save filters for specific groups of technicians, project managers, and more. Experiment with this tool to save yourself time and keystrokes!

Filter Descriptions
Most filters allow you to select one or more options (multiple techs, offices, etc.).
- Project Owning Region: Filter by selected project regions.
- Project Owning Office: Filter by selected offices. Can filter on work orders with no assigned office yet.
- Technician Office: Filter by offices assigned to specified techs.
- Work Order Number: Filter by work order number; allows partial matches.
- Recurrence No.: Filter by Recurrence number; allows partial matches.
- Work Item: Filter by work items assigned to a work order.
- Technician Availability: Filters techs displayed by the filter applied; available in Technician View.
- Work Order Times: Filter on just As Available work orders or just Scheduled work orders.
- Status: Filter by any checked/selected statuses.
- Missing Linked Forms: Shows orders with work items requiring tracked forms where no form link exists yet.
Filter Statuses
- Draft: Work orders that were created but not yet sent to the technician.
- Submitted: Work Orders sent to the technician for consideration/acceptance.
- Accepted: Work orders that have been accepted by the technician.
- Declined: Work orders that have been rejected by the technician. Typically used if the technician can't perform the work.
- Canceled: Work orders that have been canceled.
- Complete: Work orders that have been marked completed by the technician.
- Overdue: Work orders that have not been Declined, Canceled, or Completed by their scheduled date and time.
- Missing Linked Forms: Work orders that require a linked form, but that link does not exist yet.
Time Zones
Please be sure to select the correct time zone for the projects you are scheduling. When you create work order, it will assume the times you enter are based on this selected time zone. Field users/assignees will see the time according to the time zone on their device.

Tips for Using Filters
- On filters that allow you to select one or more options, select the filter so it's highlighted and press the space bar on your keyboard. This will populate all available options in a quick, easy dropdown list.
- Make a habit of clearing your filter between searches if you aren't selecting saved filters. (Click the Clear button beside the Search button.) This'll help ensure you don't have old criteria selected for your new search.
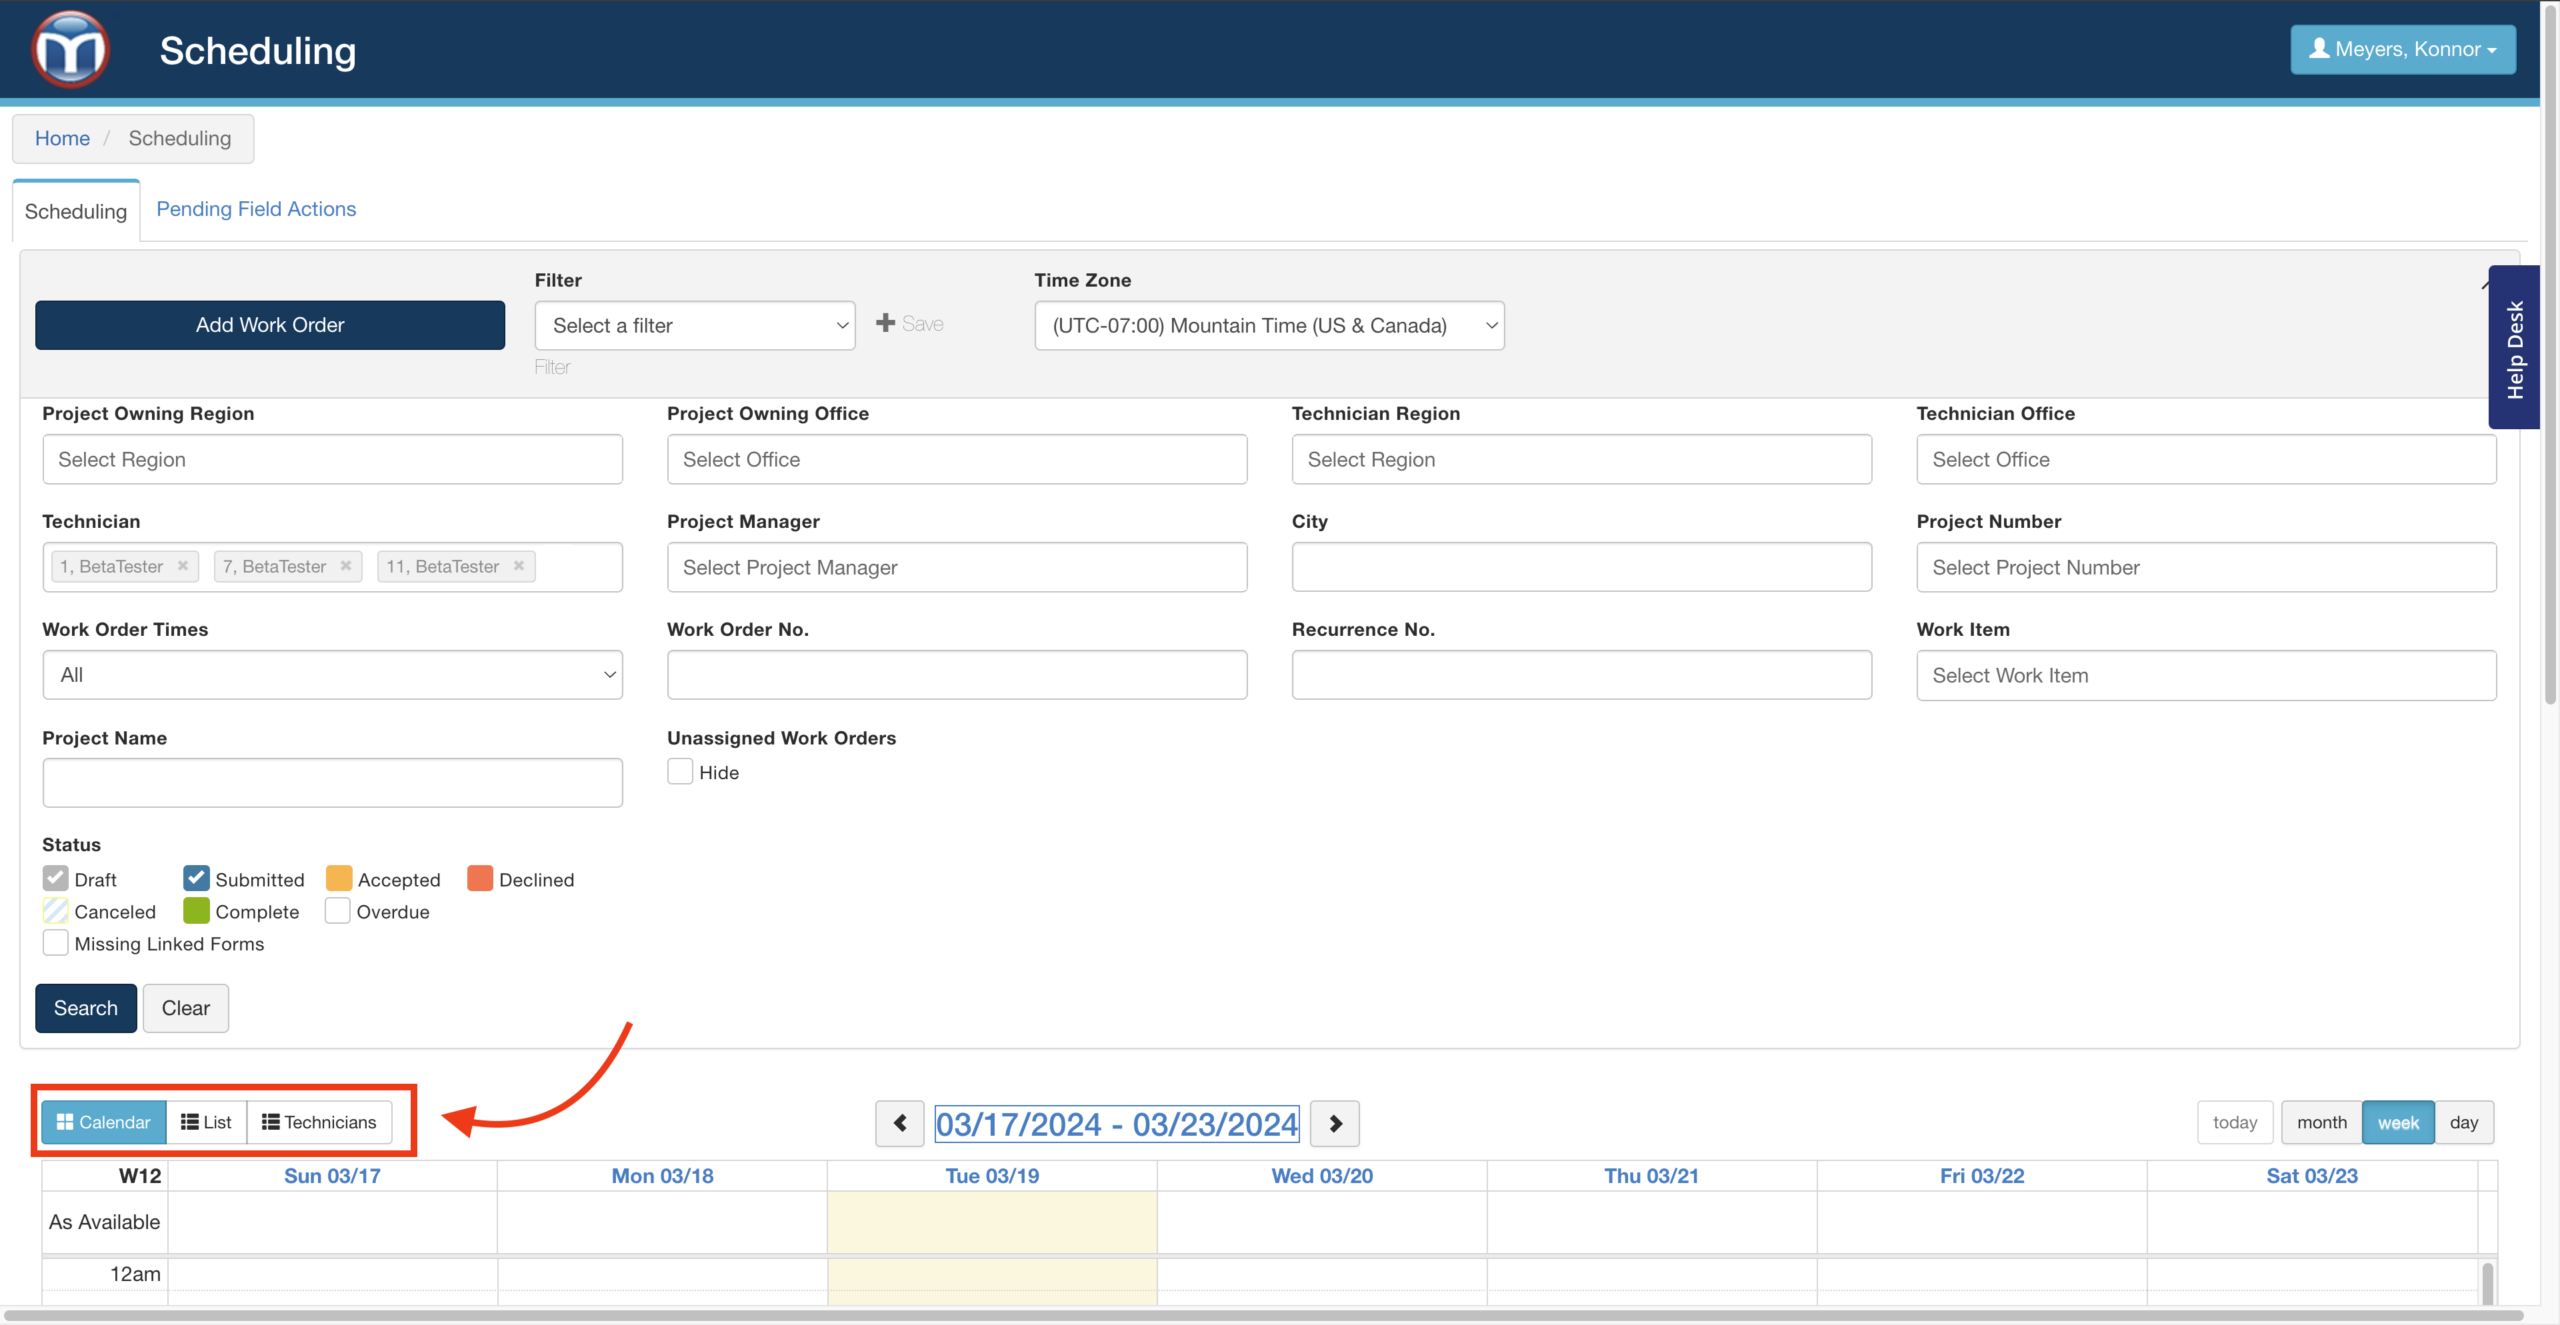
Viewing Your Schedule
Schedule gives you three views to choose from: Calendar, List, and Technicians. Each has unique features and advantages, depending on what you'd like to do.
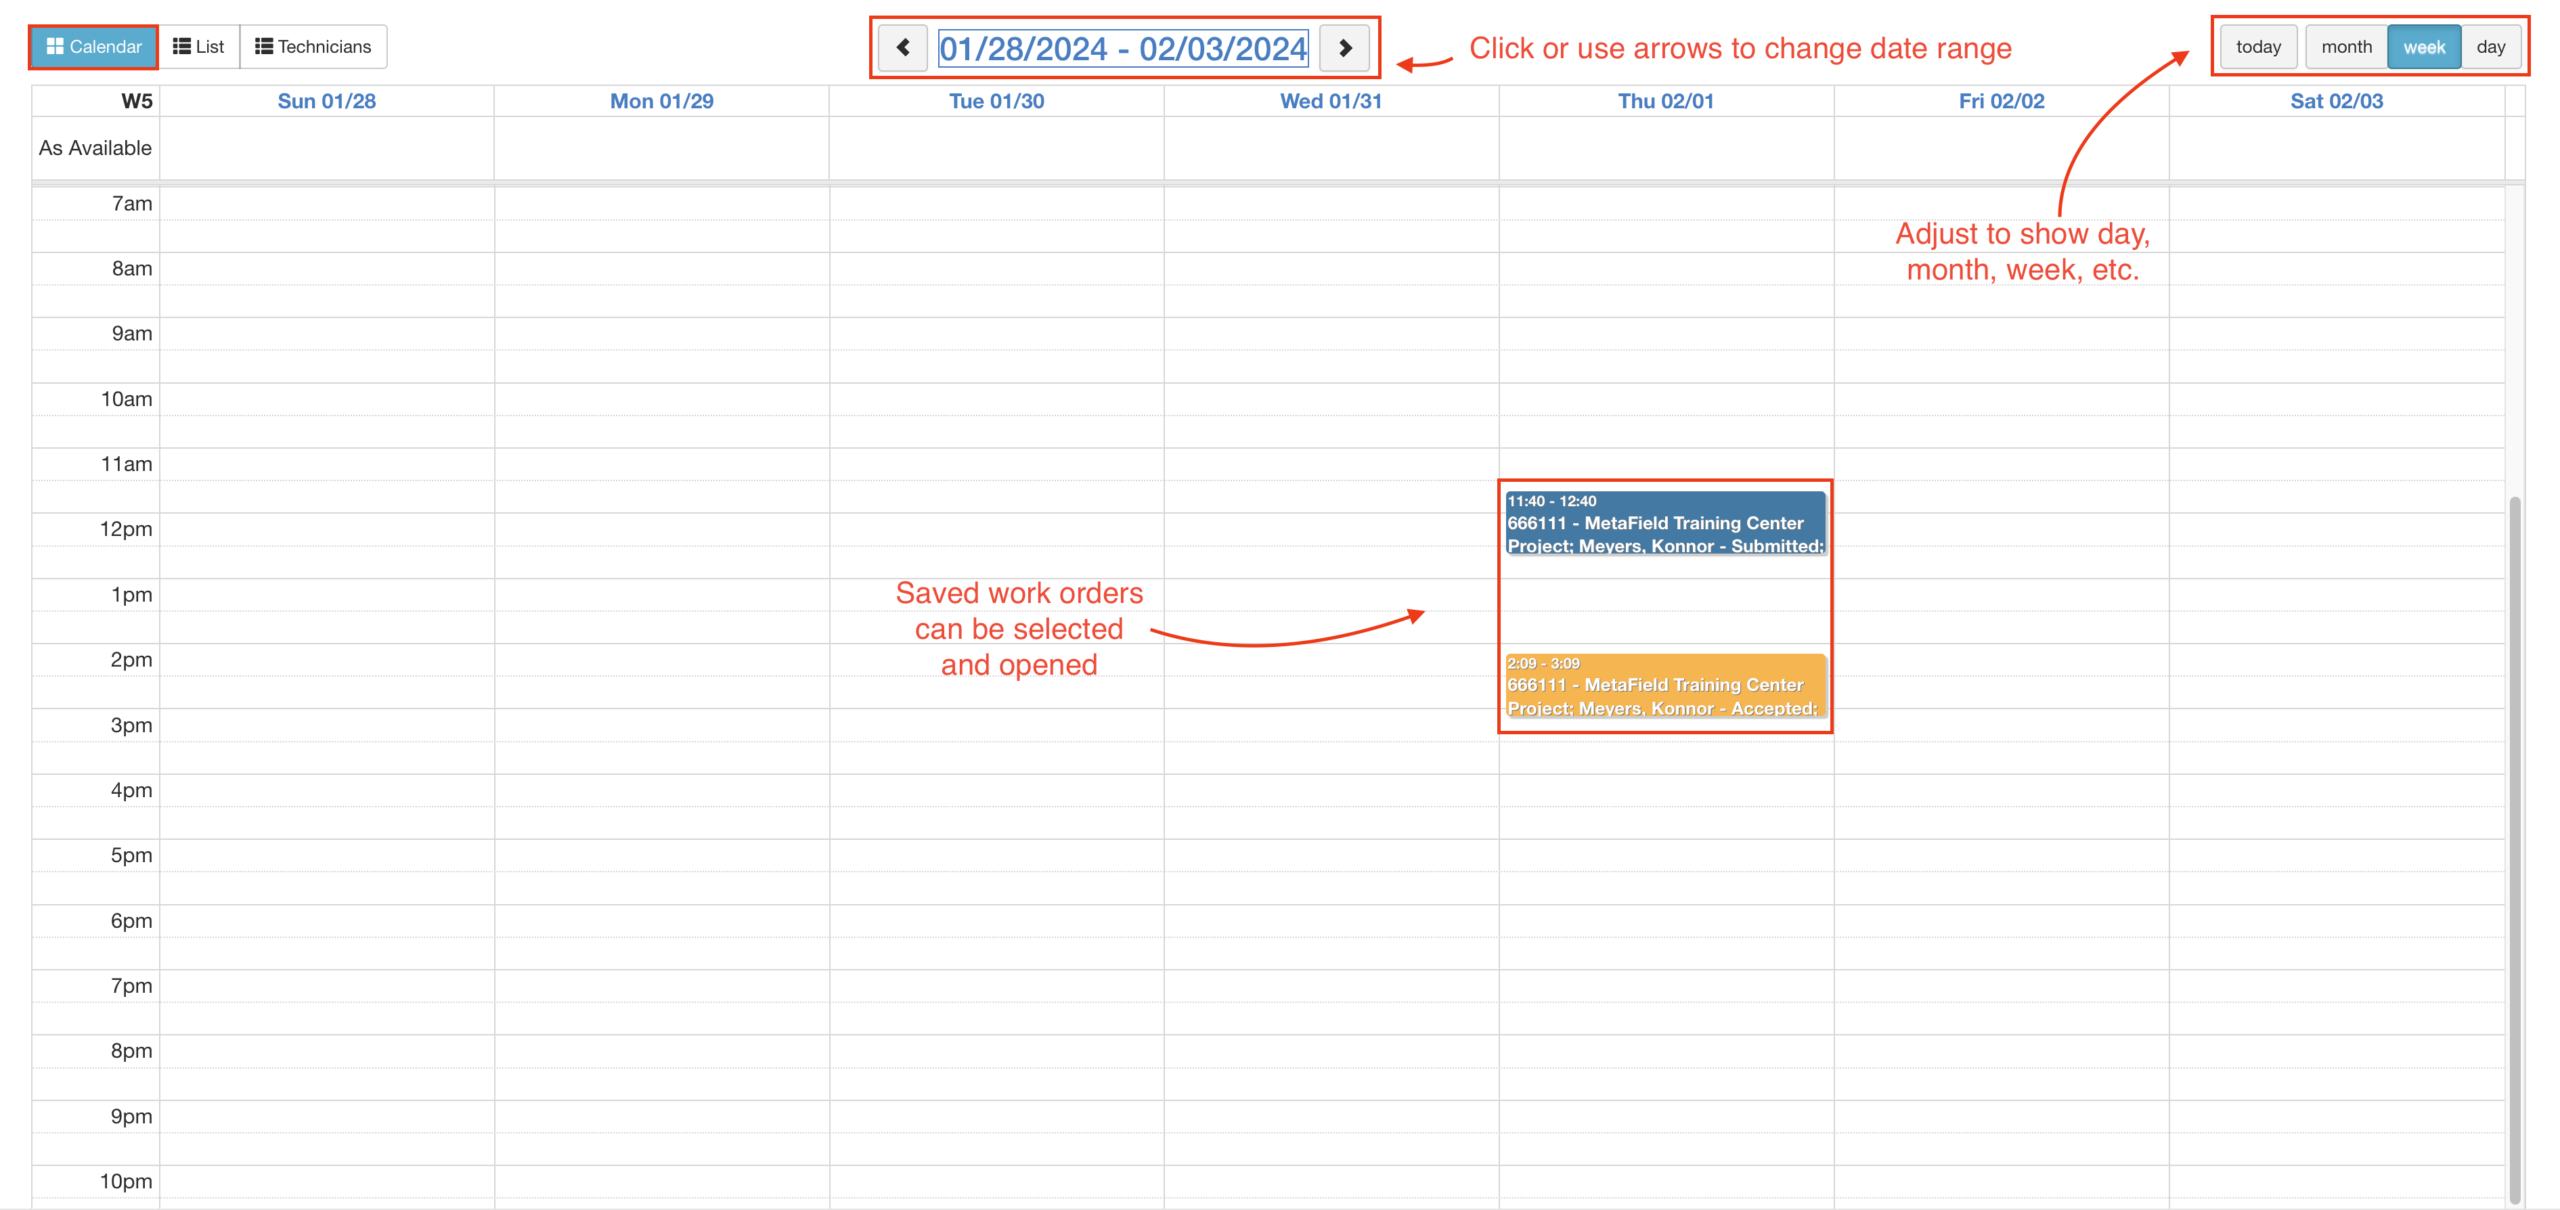
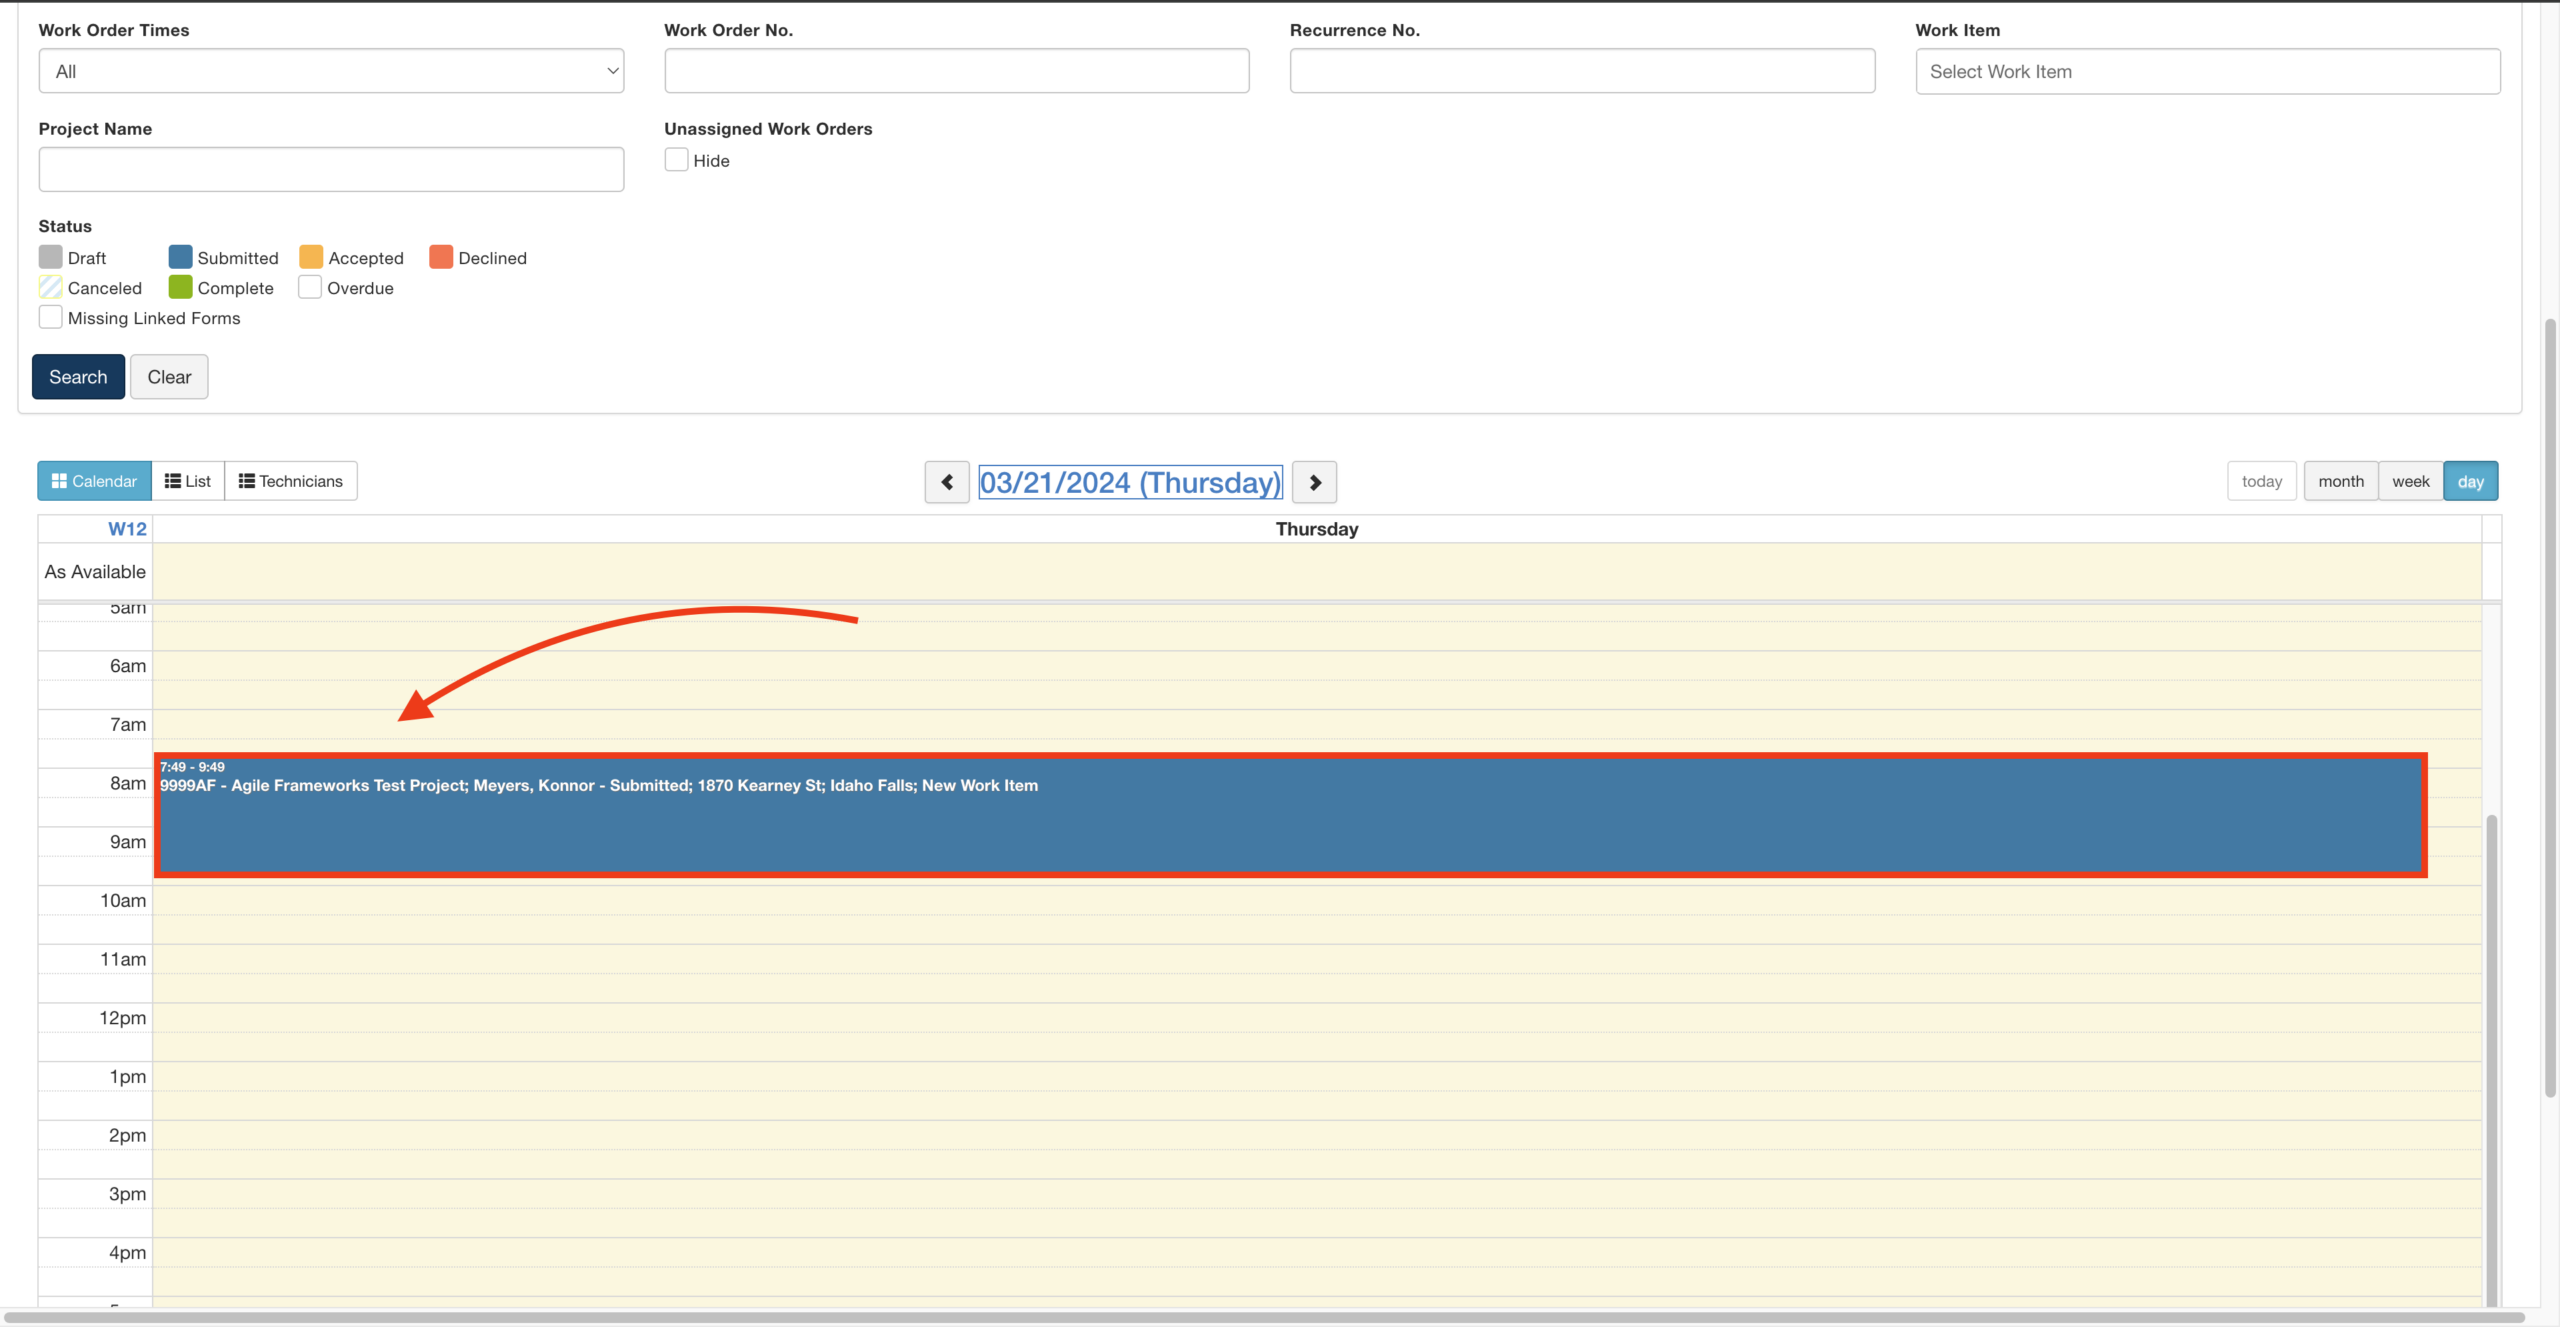
Calendar View
Calendar View helps visualize your schedule by date/time. It gives you a helpful snapshot of what the chosen time range looks like. This view will refresh as field techs accept, complete, or reject work orders.
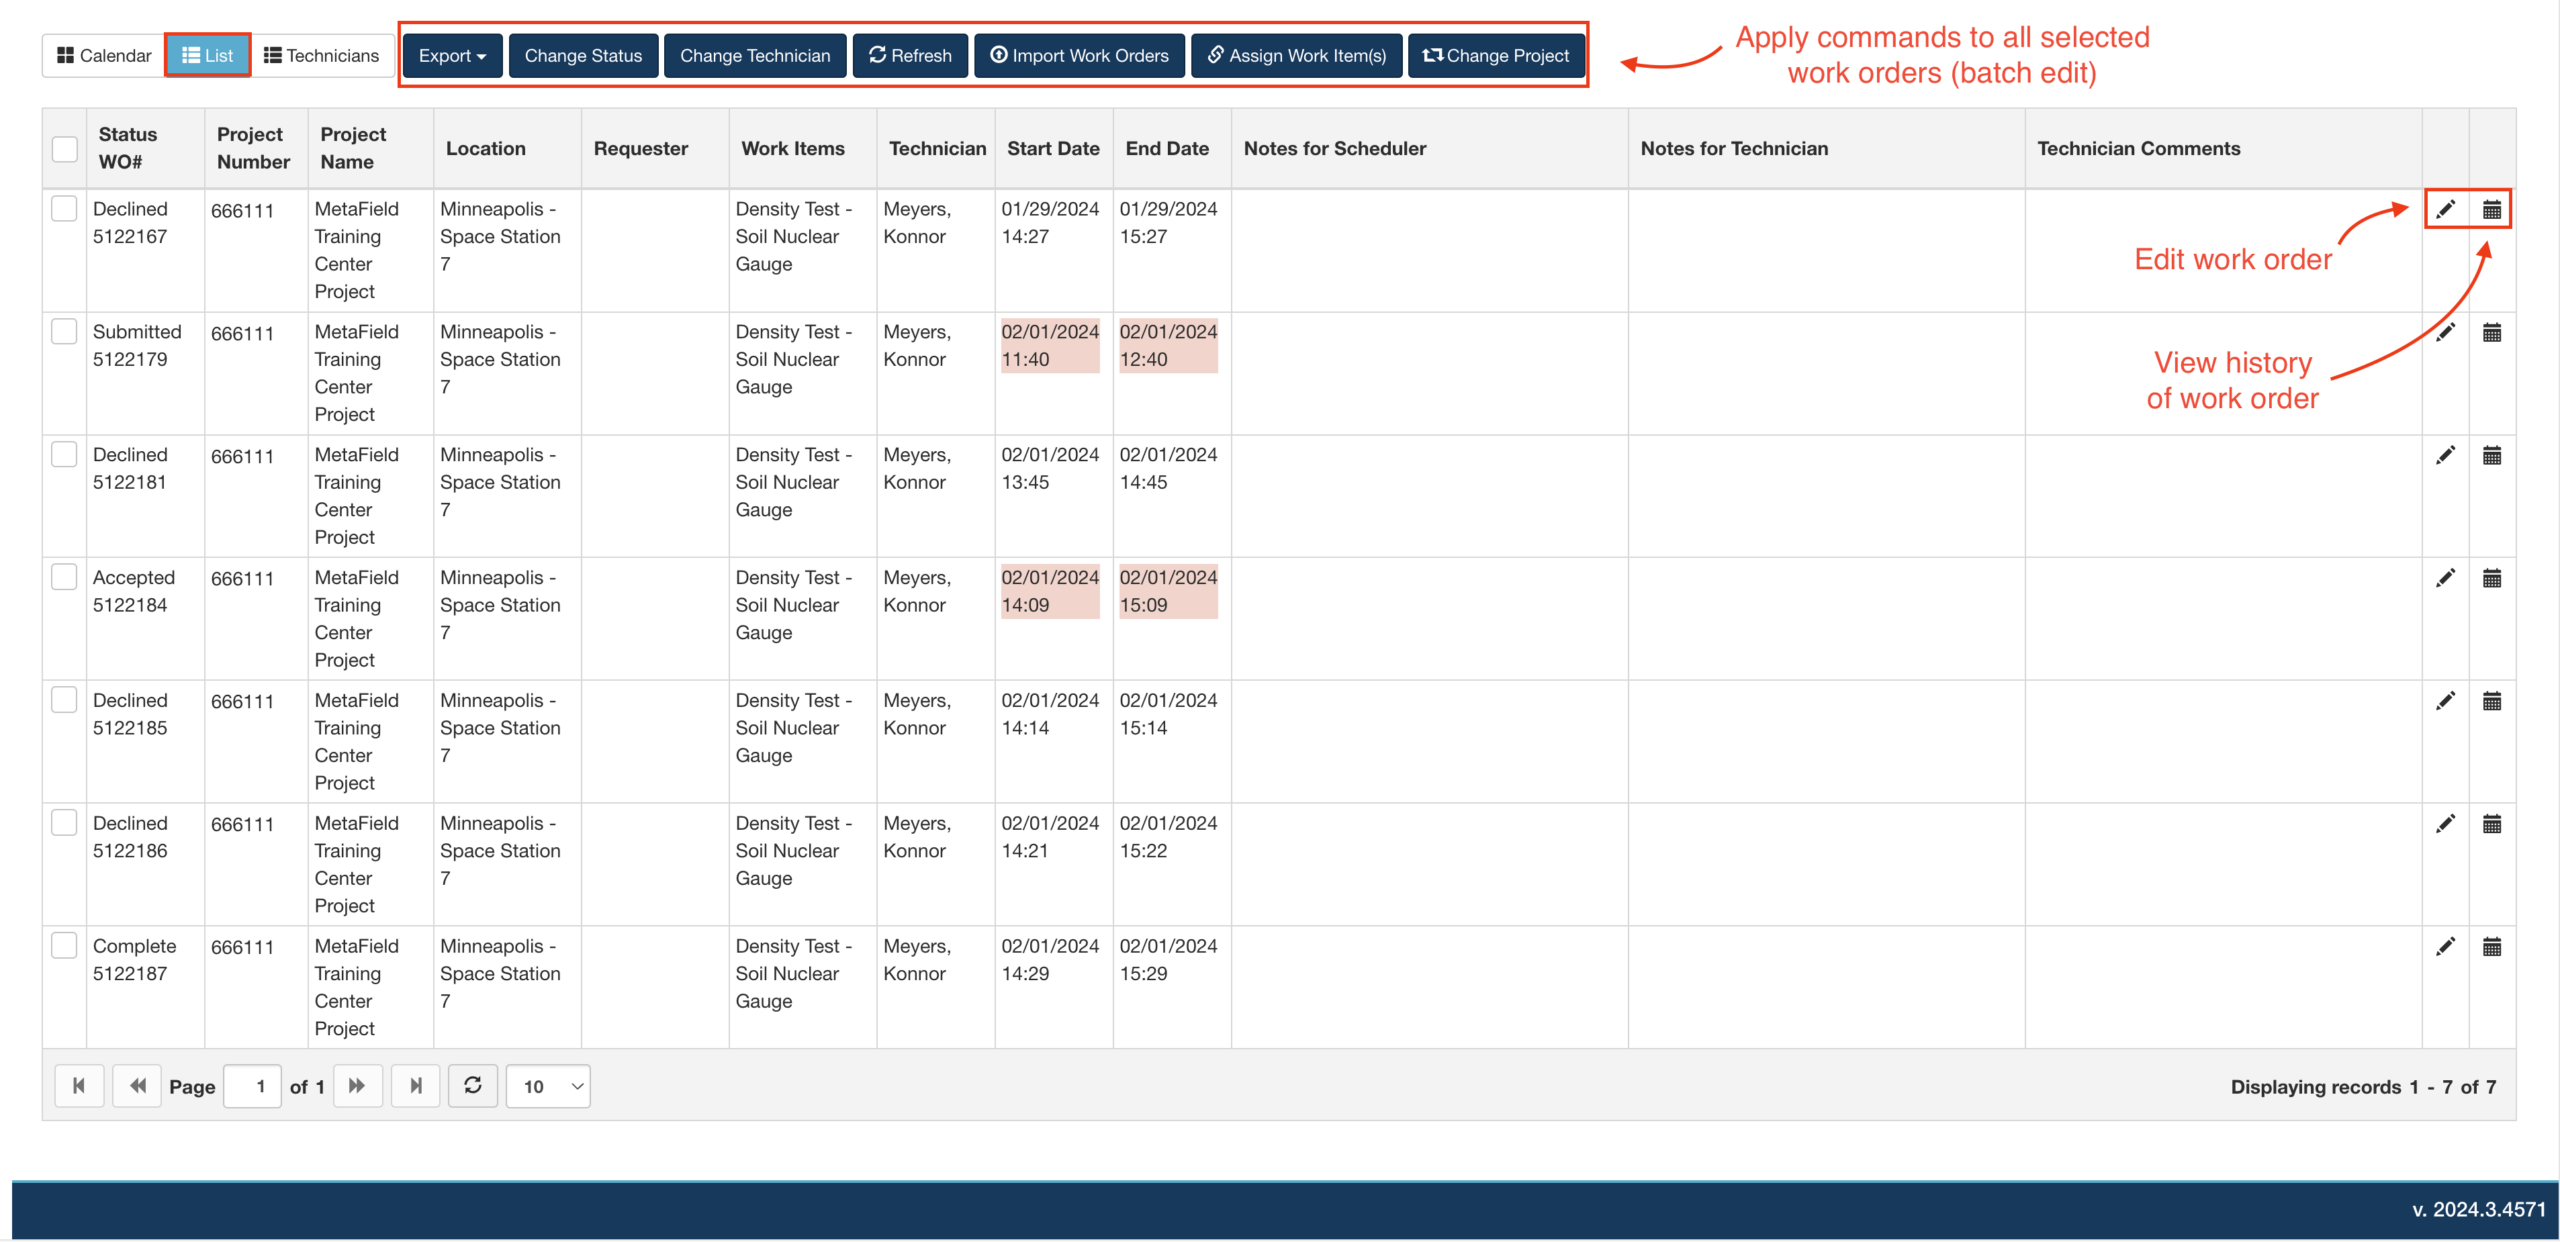
List View
List View is great for changing the status of work orders, especially in bulk. You can select multiple work orders and apply commands to all of them at once. This view will also refresh as field techs accept, complete, or reject work orders.
Technicians View
Technicians View is perfect for updating or adding work quickly. It lets you drag work orders between technicians and create new work orders in seconds.

You can also create work orders using Technicians view! Simply click the date or time you'd like to schedule work against. This will open the Project Search so you can start creating your work order. This is one of the most efficient ways to schedule work in MetaField. Notice how the selected date, time, and duration all carry over to the work order.
Creating Work Orders
Here's the basic flow for creating a work order in Schedule. Click any of these steps for more details:
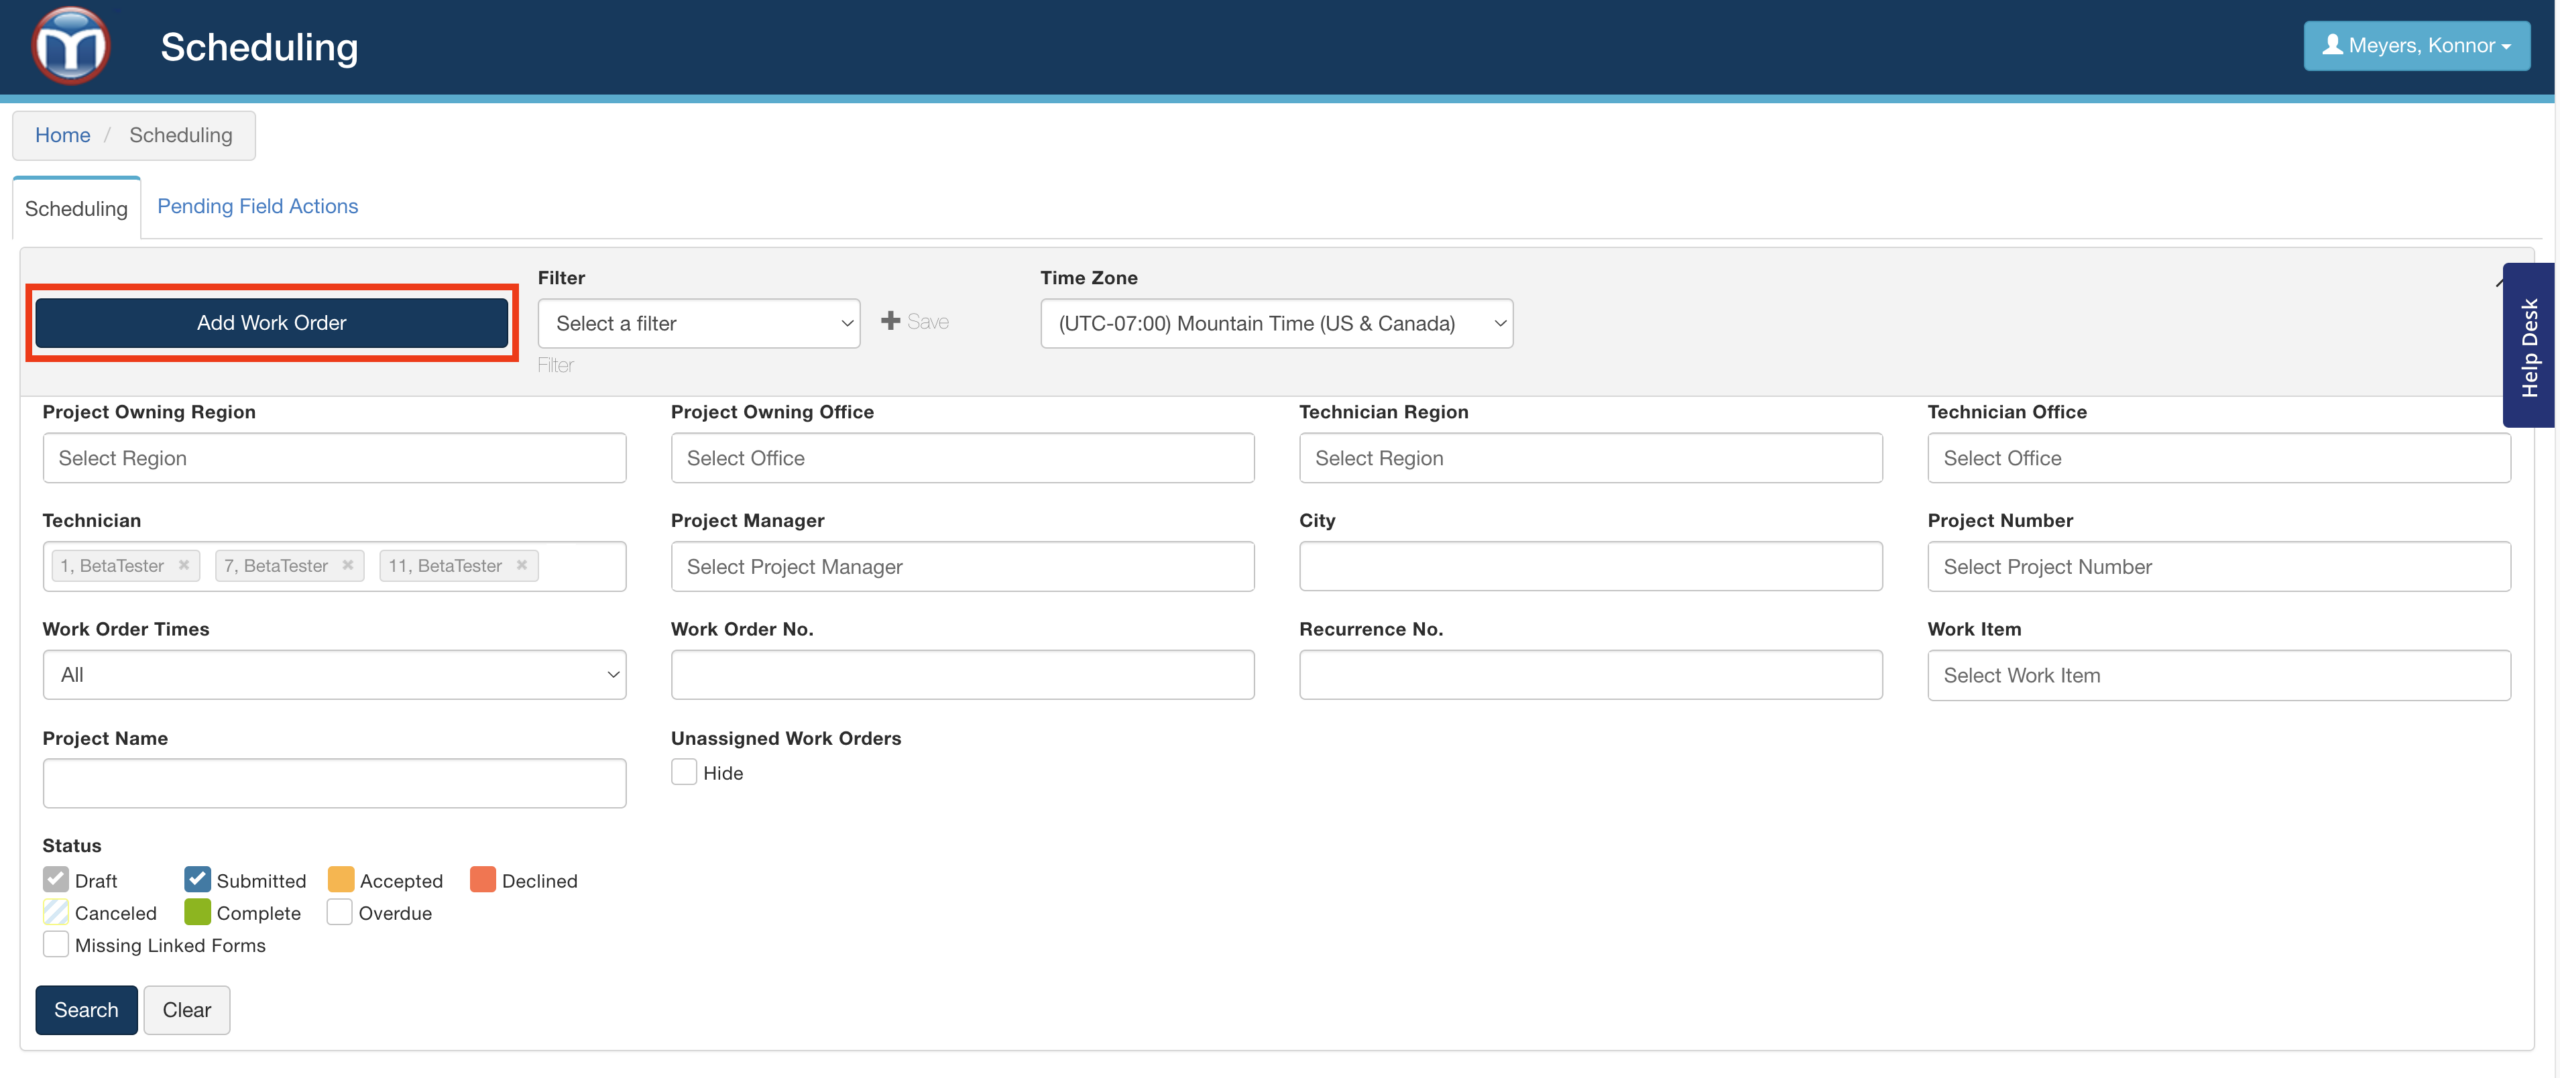
1: Select a Project
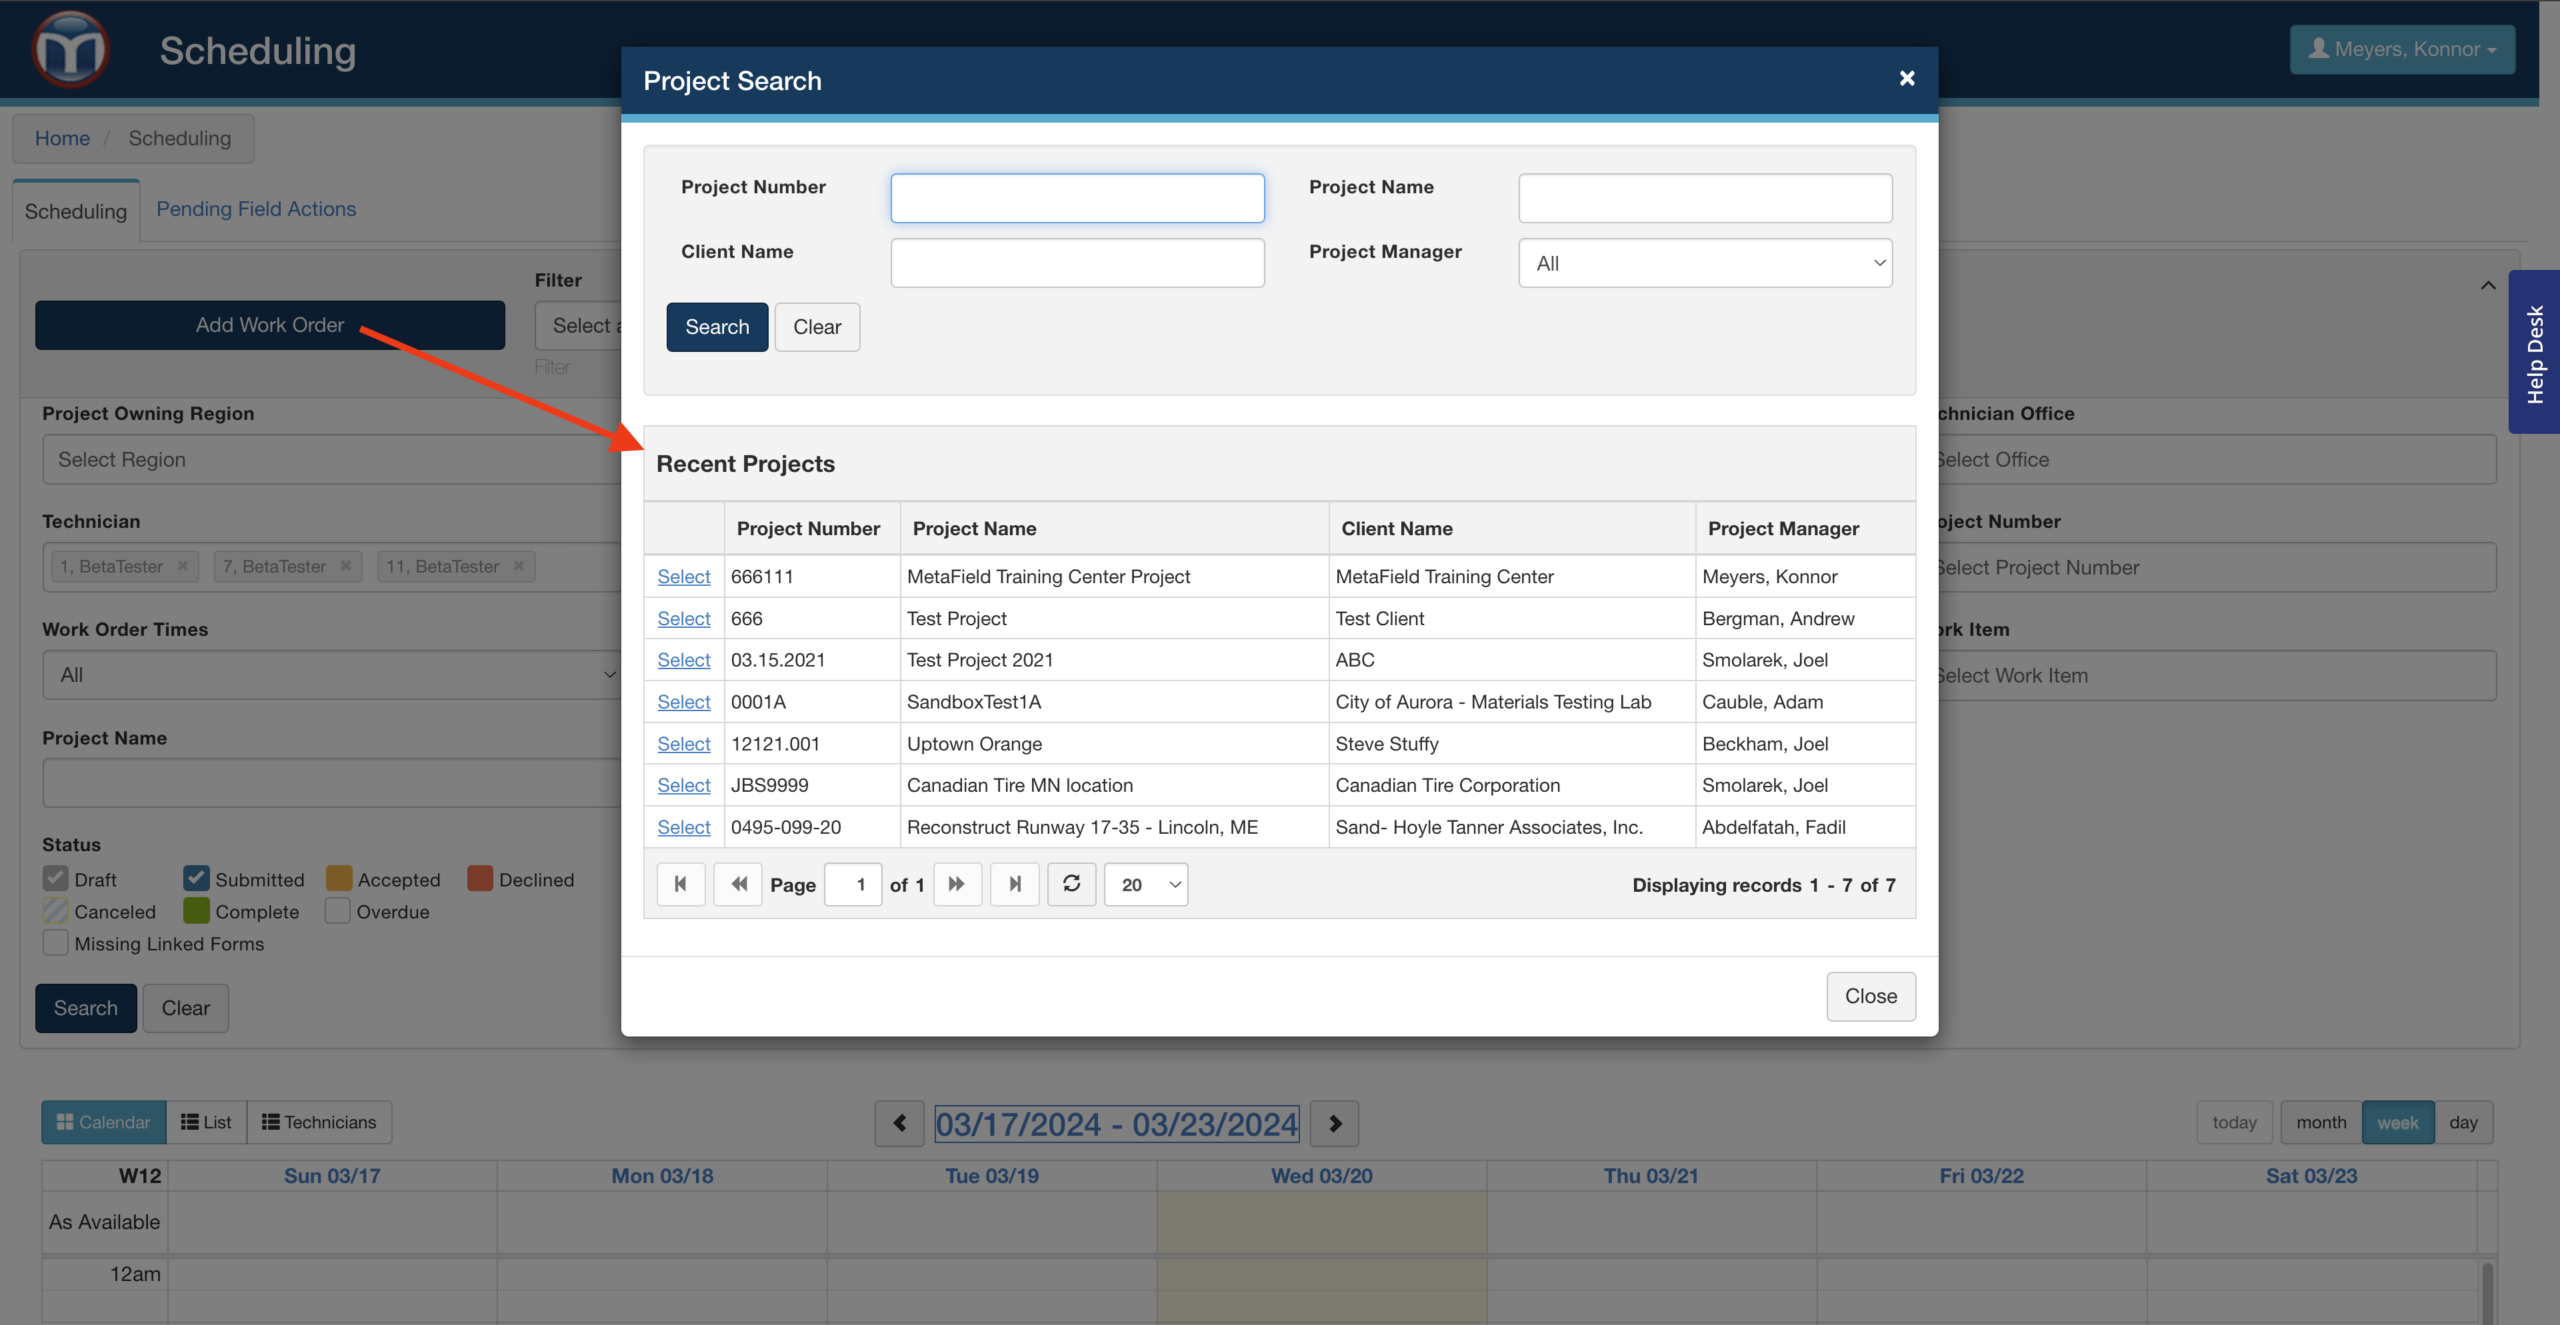
All work orders in MetaField are assigned to a specific project. So if you'd like to create a work order, you'll have to select a project first. Start by clicking Add Work Order, then choosing a project for it.
The Project Search window will let you search for your project using the available fields. If you've used the system before, you can skip the search by selecting an item under Recent Projects. Whatever project you choose will appear in this list next time.
2: Add Work Items
After choosing a project, you'll reach the Add/Edit Work Order screen. Here you can add any required work items to your work order. Please note: your work order must contain at least one work item.

- Require Form Tracking
Selecting this indicates that the work item should have a completed form tracked against it. - Linked Forms
Selecting this indicates that a linked form is required for the work item. - Add & Edit Location Details
You can include important info in the Location area, like site plan coordinates, project docs, or even a GPS location to help techs navigate to the job site.
3: Set Times & Add Technicians
Further down the Add/Edit Work Order page, you'll see fields covering the start times and duration for the work. Any required fields are marked by a red asterisk (*).
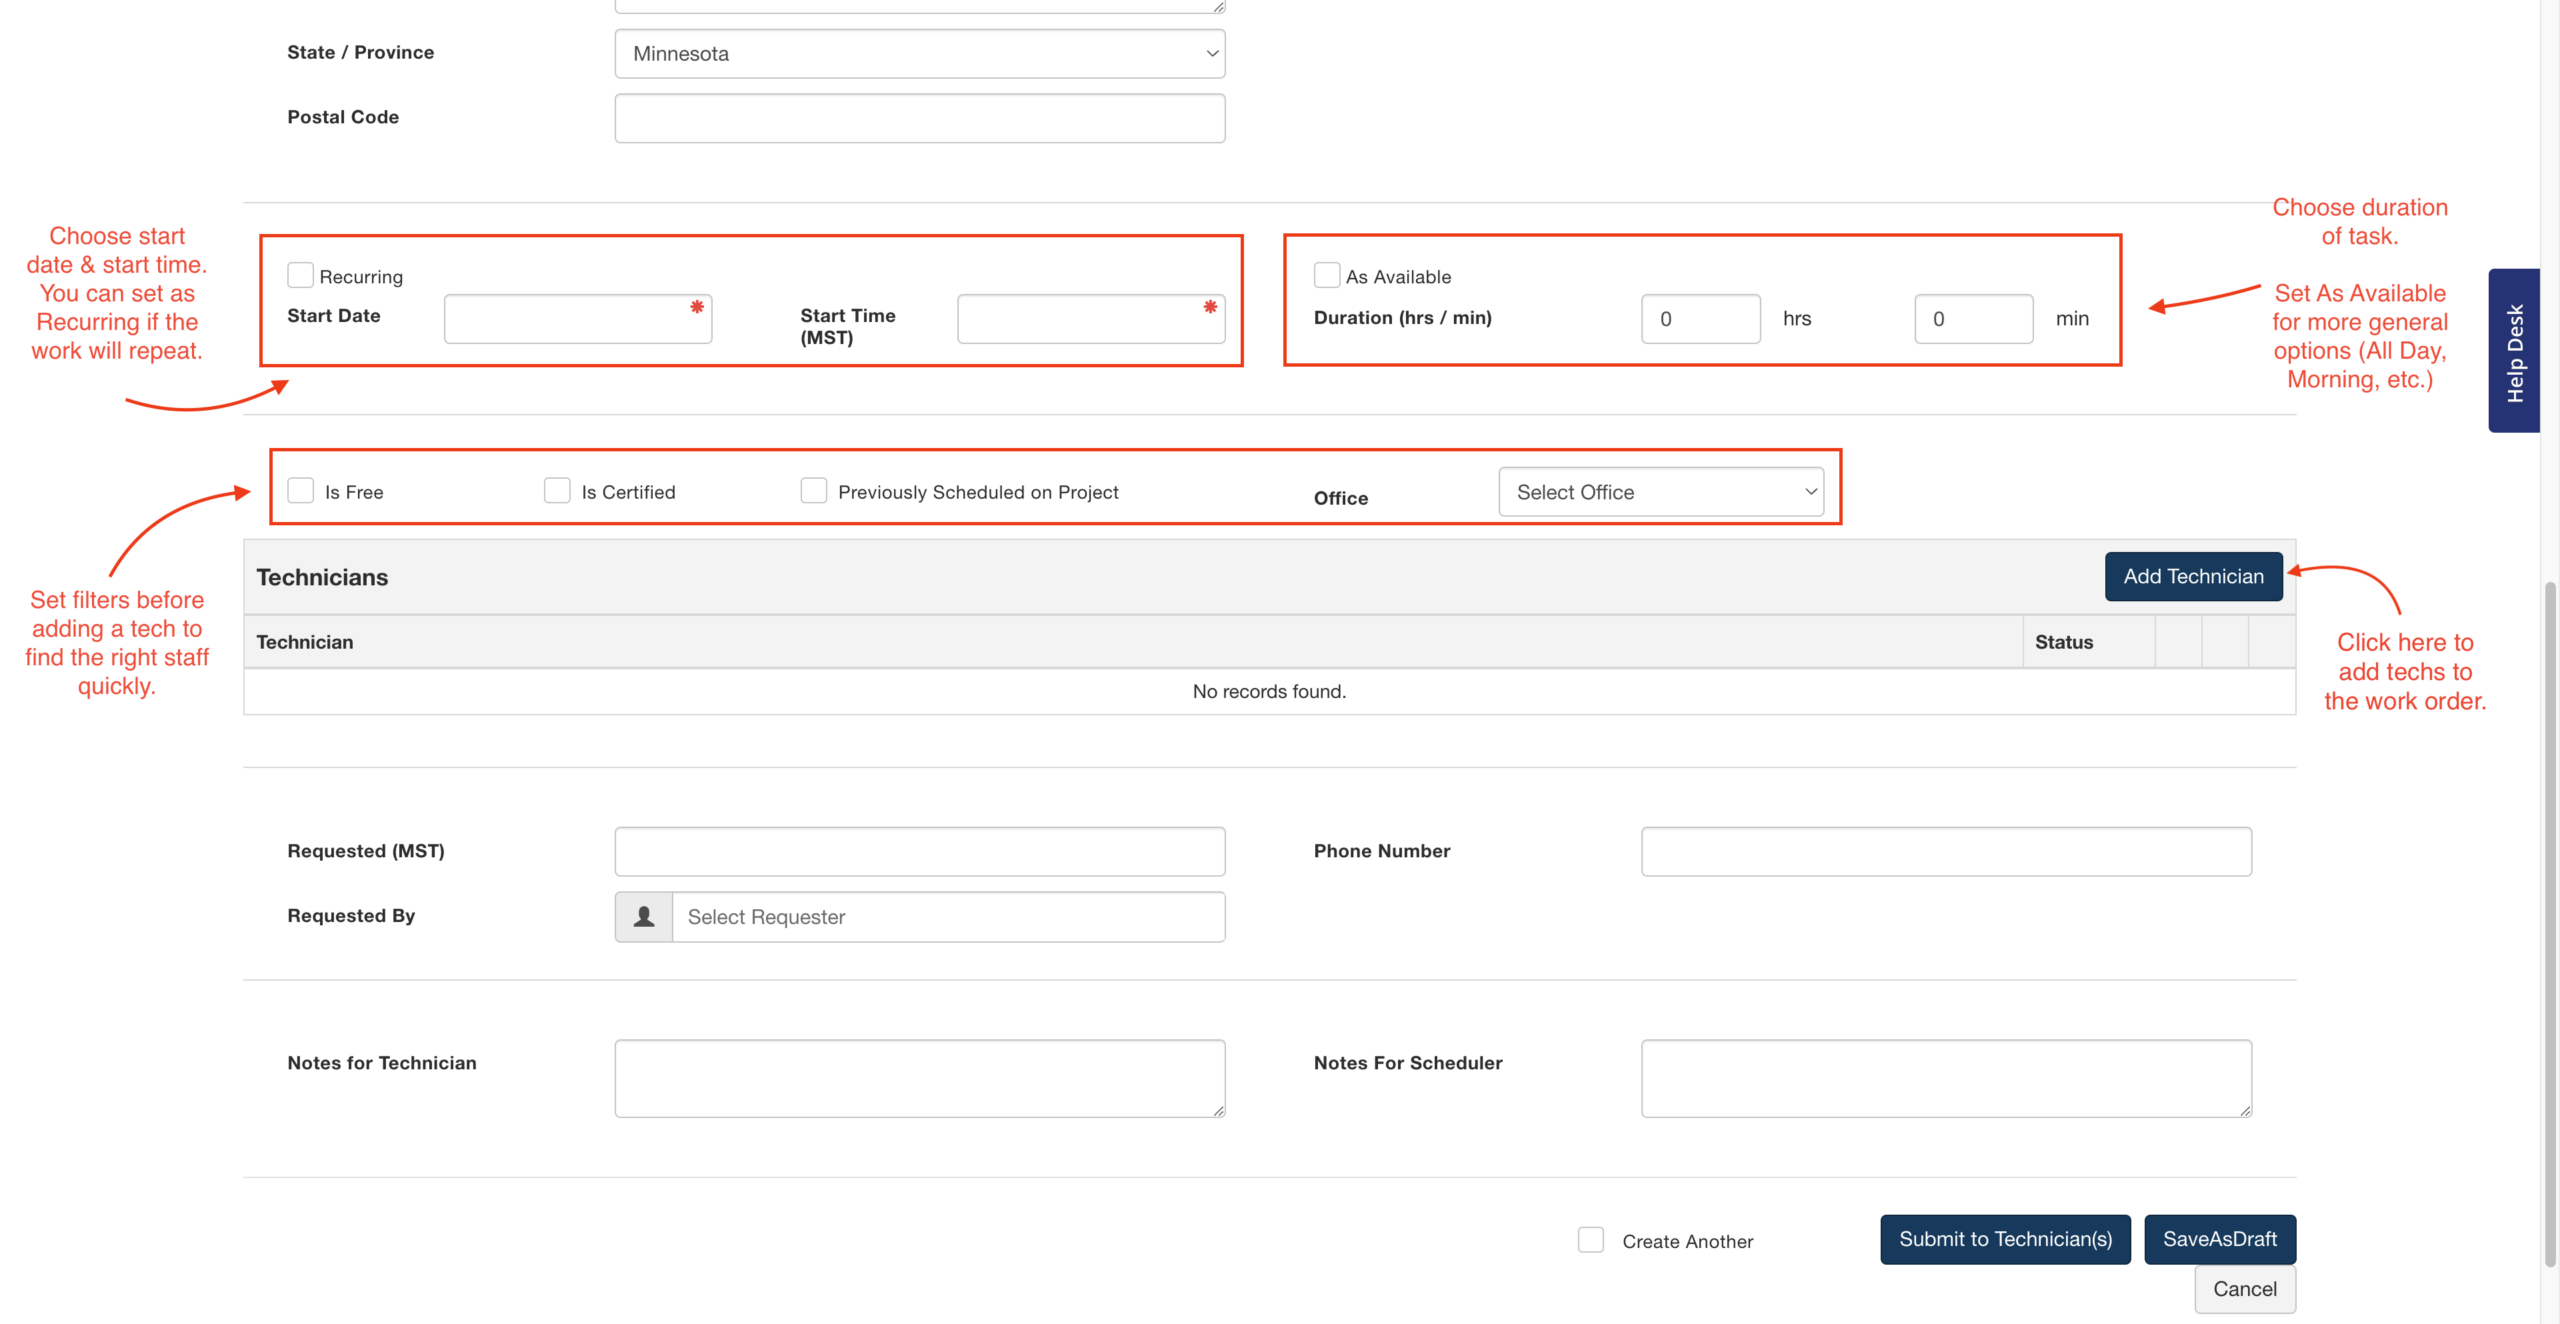
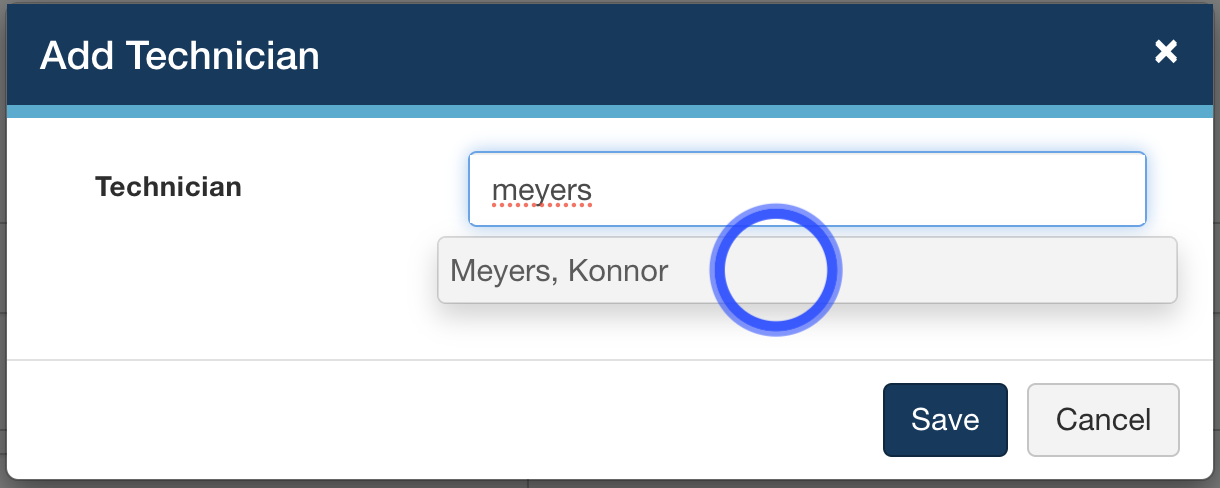
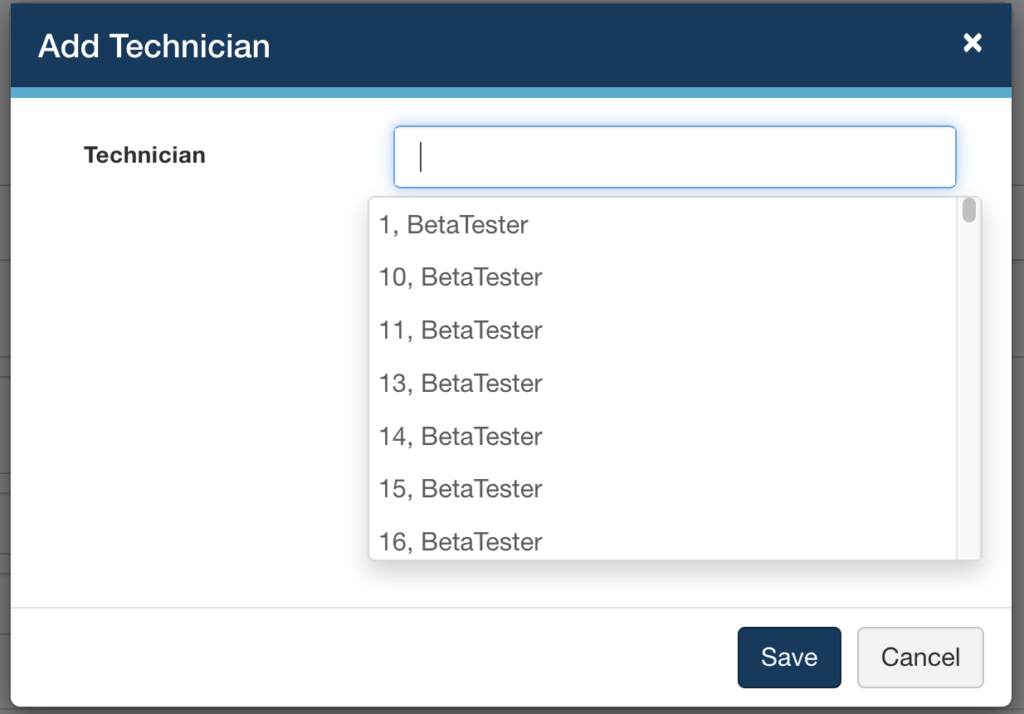
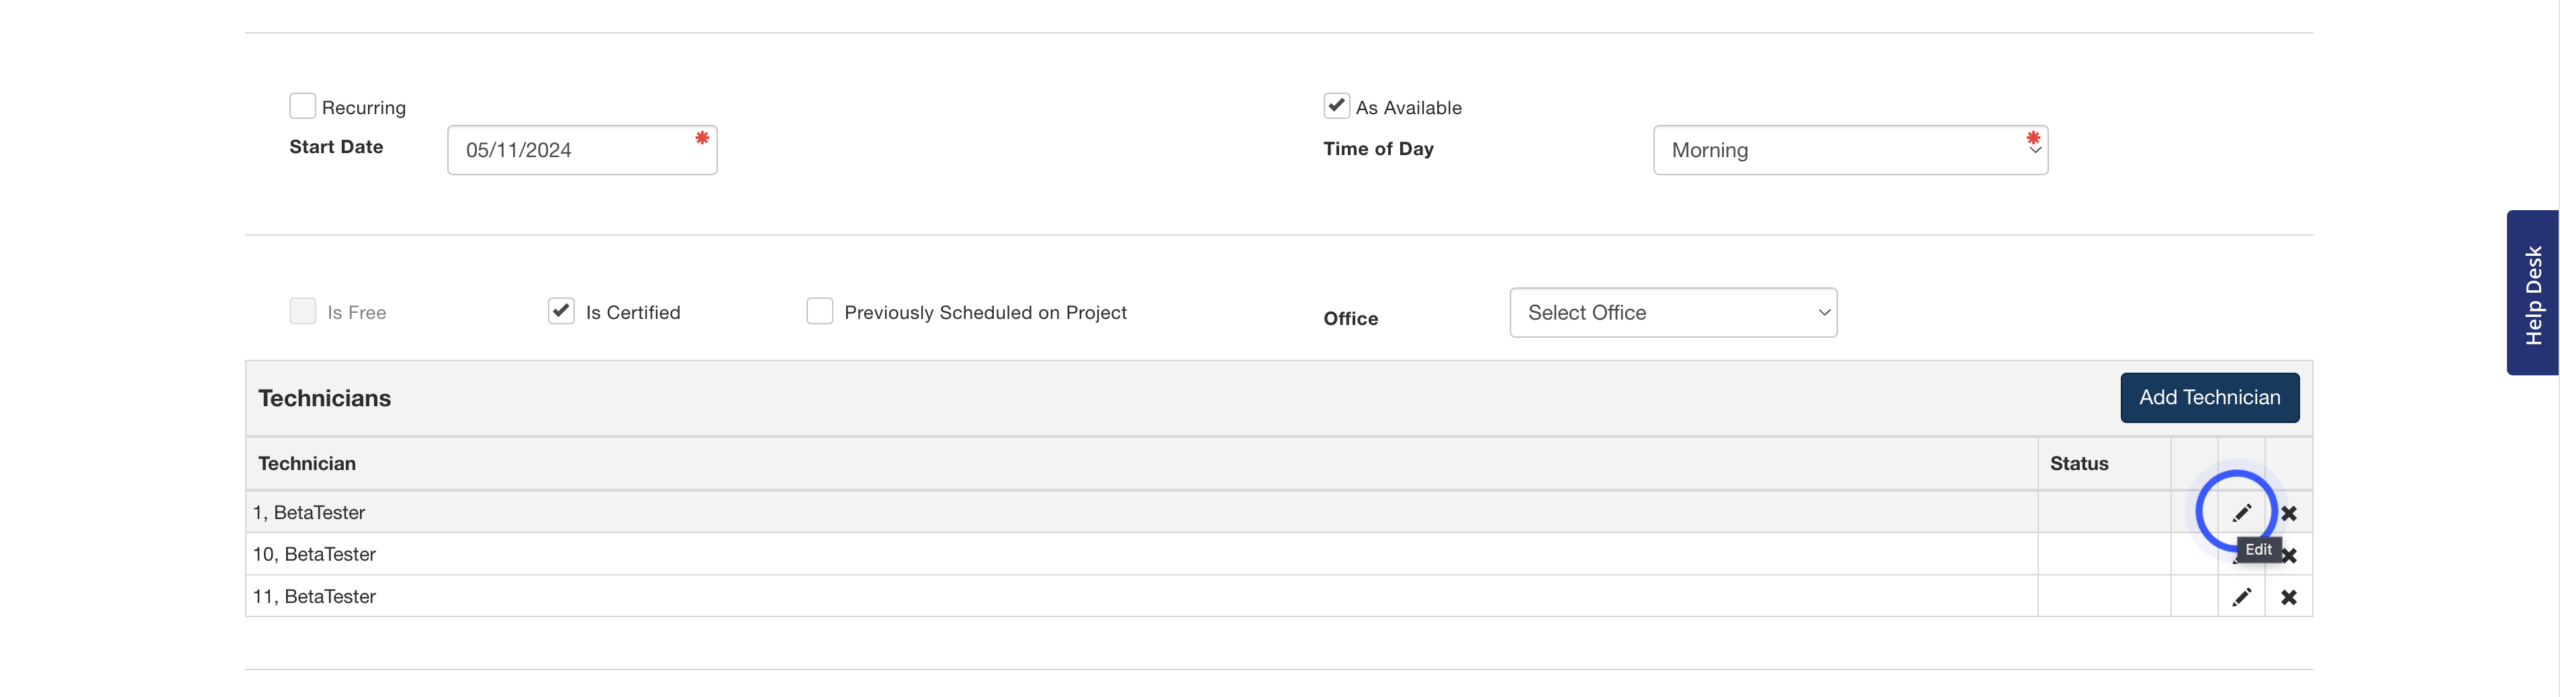
In the Add Technician window, you can type out the tech's name - or press the space bar on your keyboard to view a dropdown of all available techs based on your filters (Is Free, Certified, etc.).
Simply repeat this process to add multiple techs to the work order. You can edit or remove added techs using the pencil and X buttons in their row.
4: Add Notes & Submit or Save
Now that you've built the work order, it's time to add the finishing touches. At the very bottom of the Add/Edit Work Order page, you'll see optional areas for adding notes and other information:
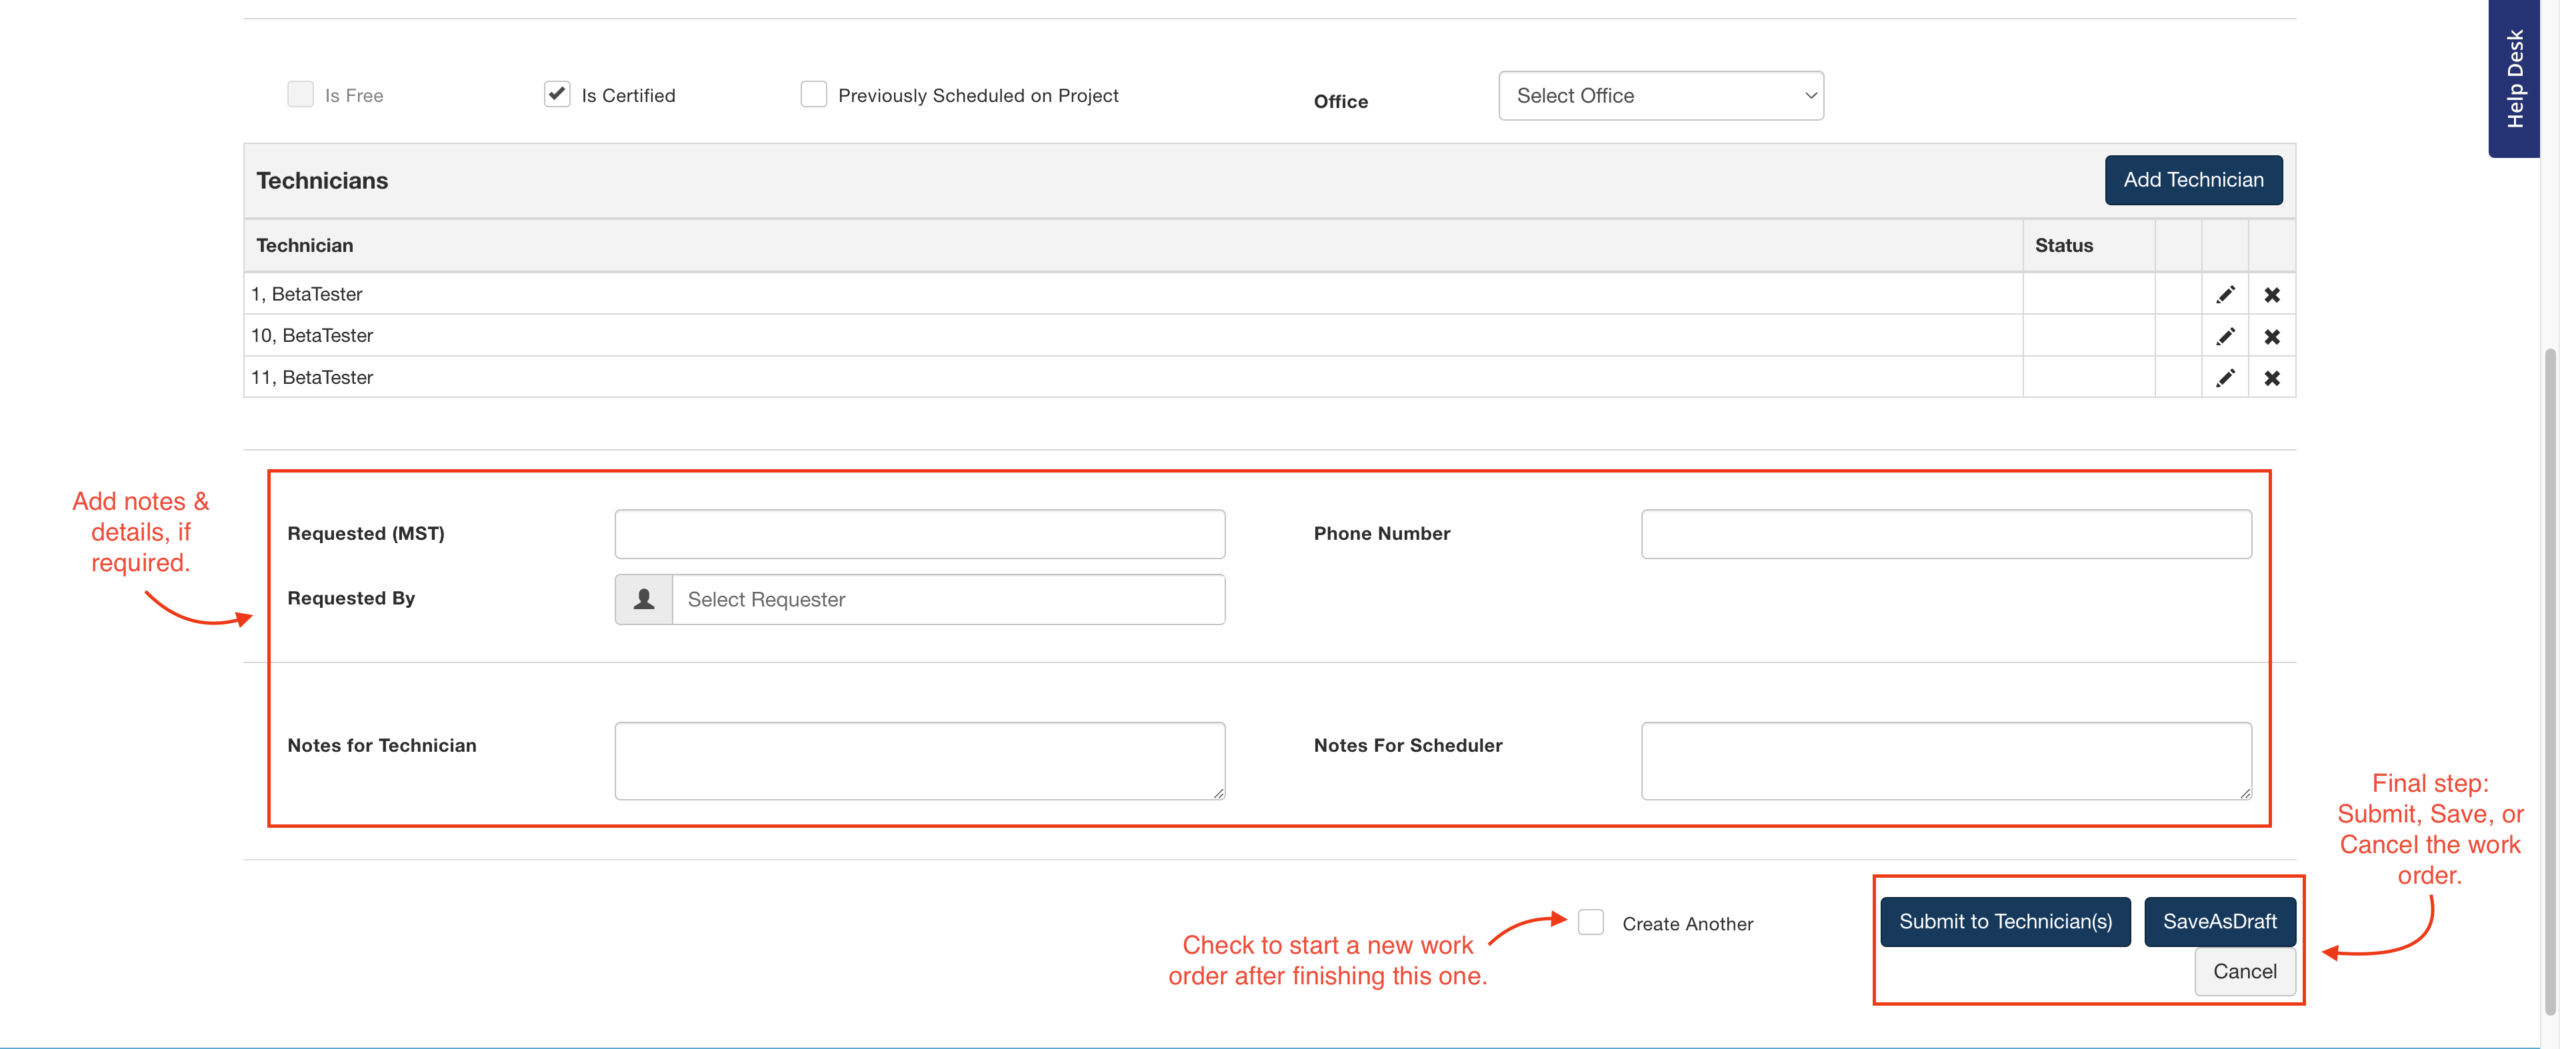
- Requested (Time Zone): Enter the date and time the work order was requested.
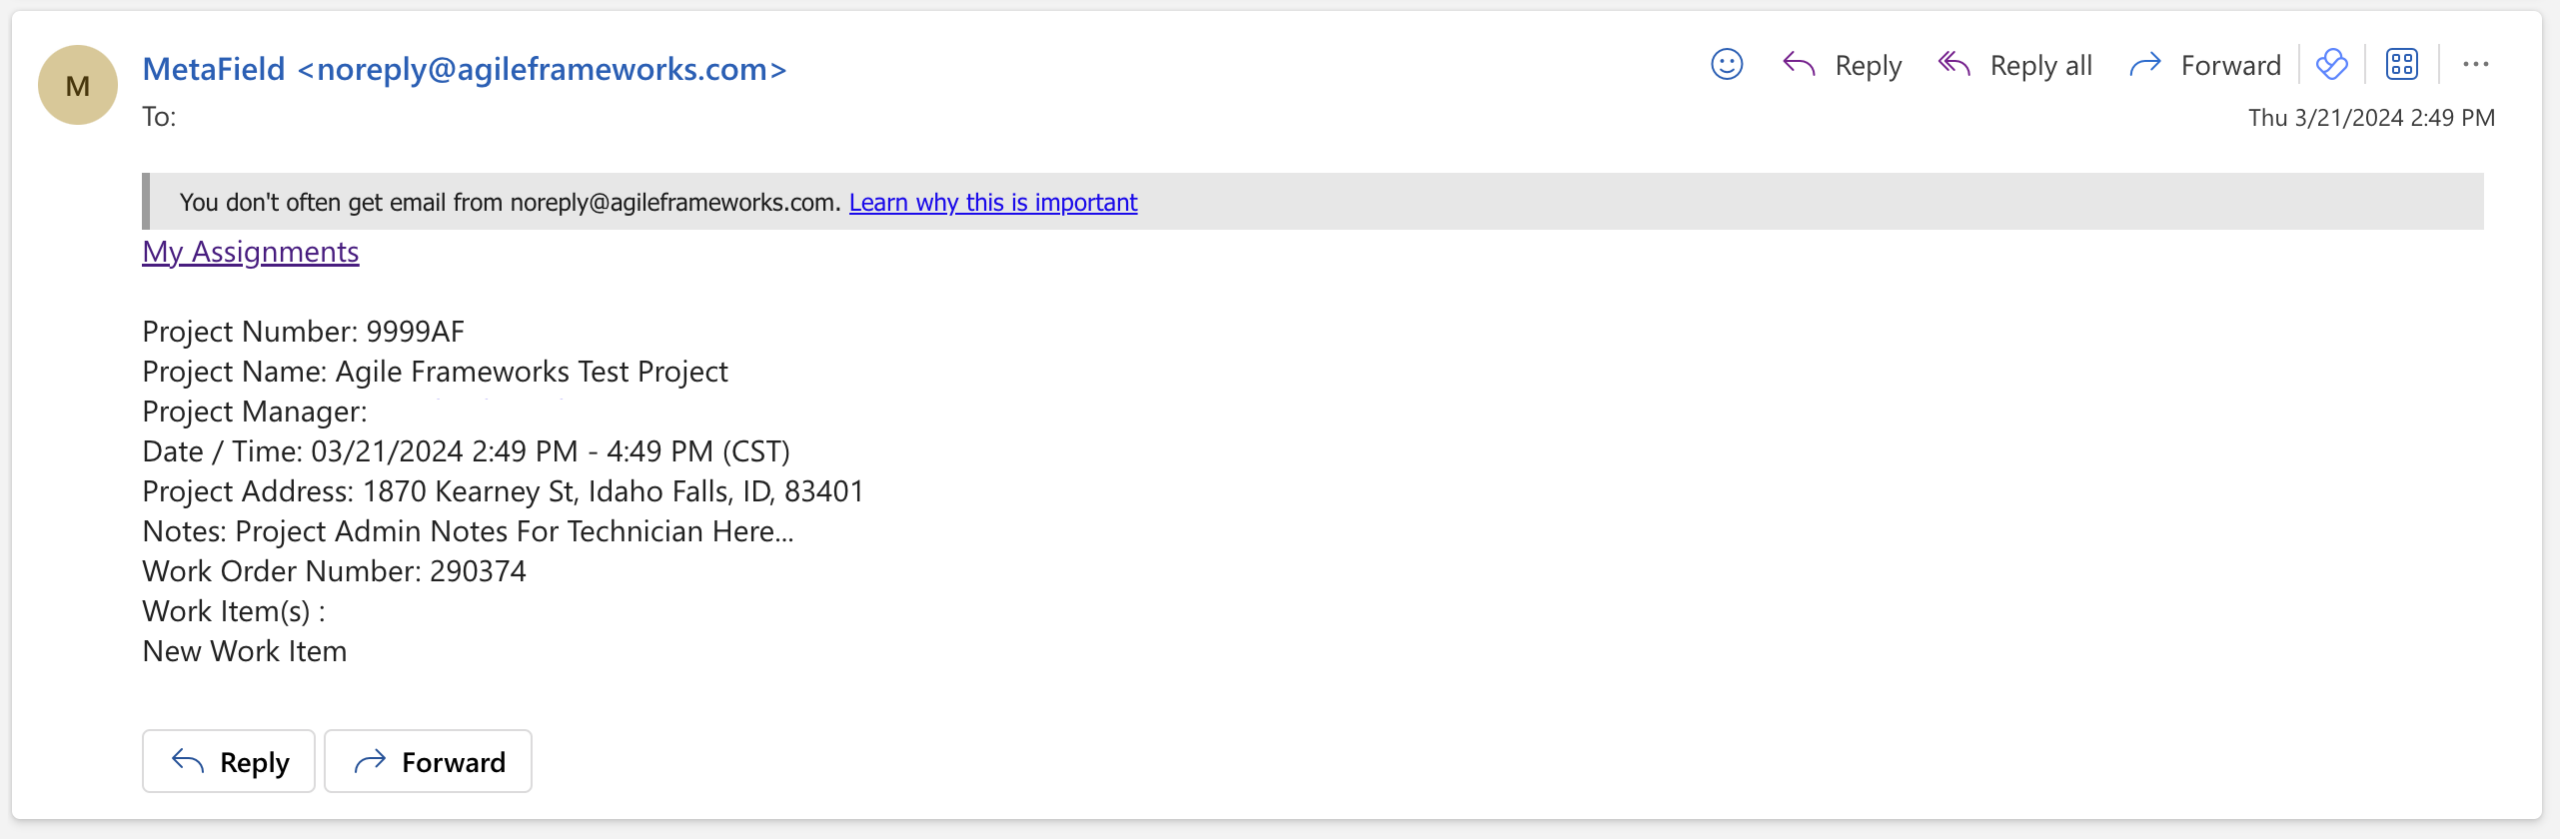
- Requested By: This name will appear for the field tech in Field > My Assignments, as well as on work order emails.
- Phone Number: Enter the number of the person who requested the work. This will appear for the field tech in Field > My Assignments, as well as on work order emails.
- Notes for Technician: The field tech can view these notes when accessing their work orders.
- Notes for Scheduler: The field technician will not see these notes.
Once you've finished adding any required details, you'll have three final options for the work order:
- Submit to Technician(s) will save the work order and give it the "Submitted" status. Field techs you added will be notified about their new work order.
- SaveAsDraft will save your work order and give it the "Draft" status. Field techs you added will not be notified until the status is updated from Draft to Submitted.
- Cancel will delete the work order and take you back to the home screen of Schedule.
Warnings When Saving a Work Order
When you save a work order, you may see one or more warning messages. These are purely informational and designed to help you avoid mistakes or scheduling conflicts. Click OK to close the warning and save the work order, or Cancel to return to and alter the work order.
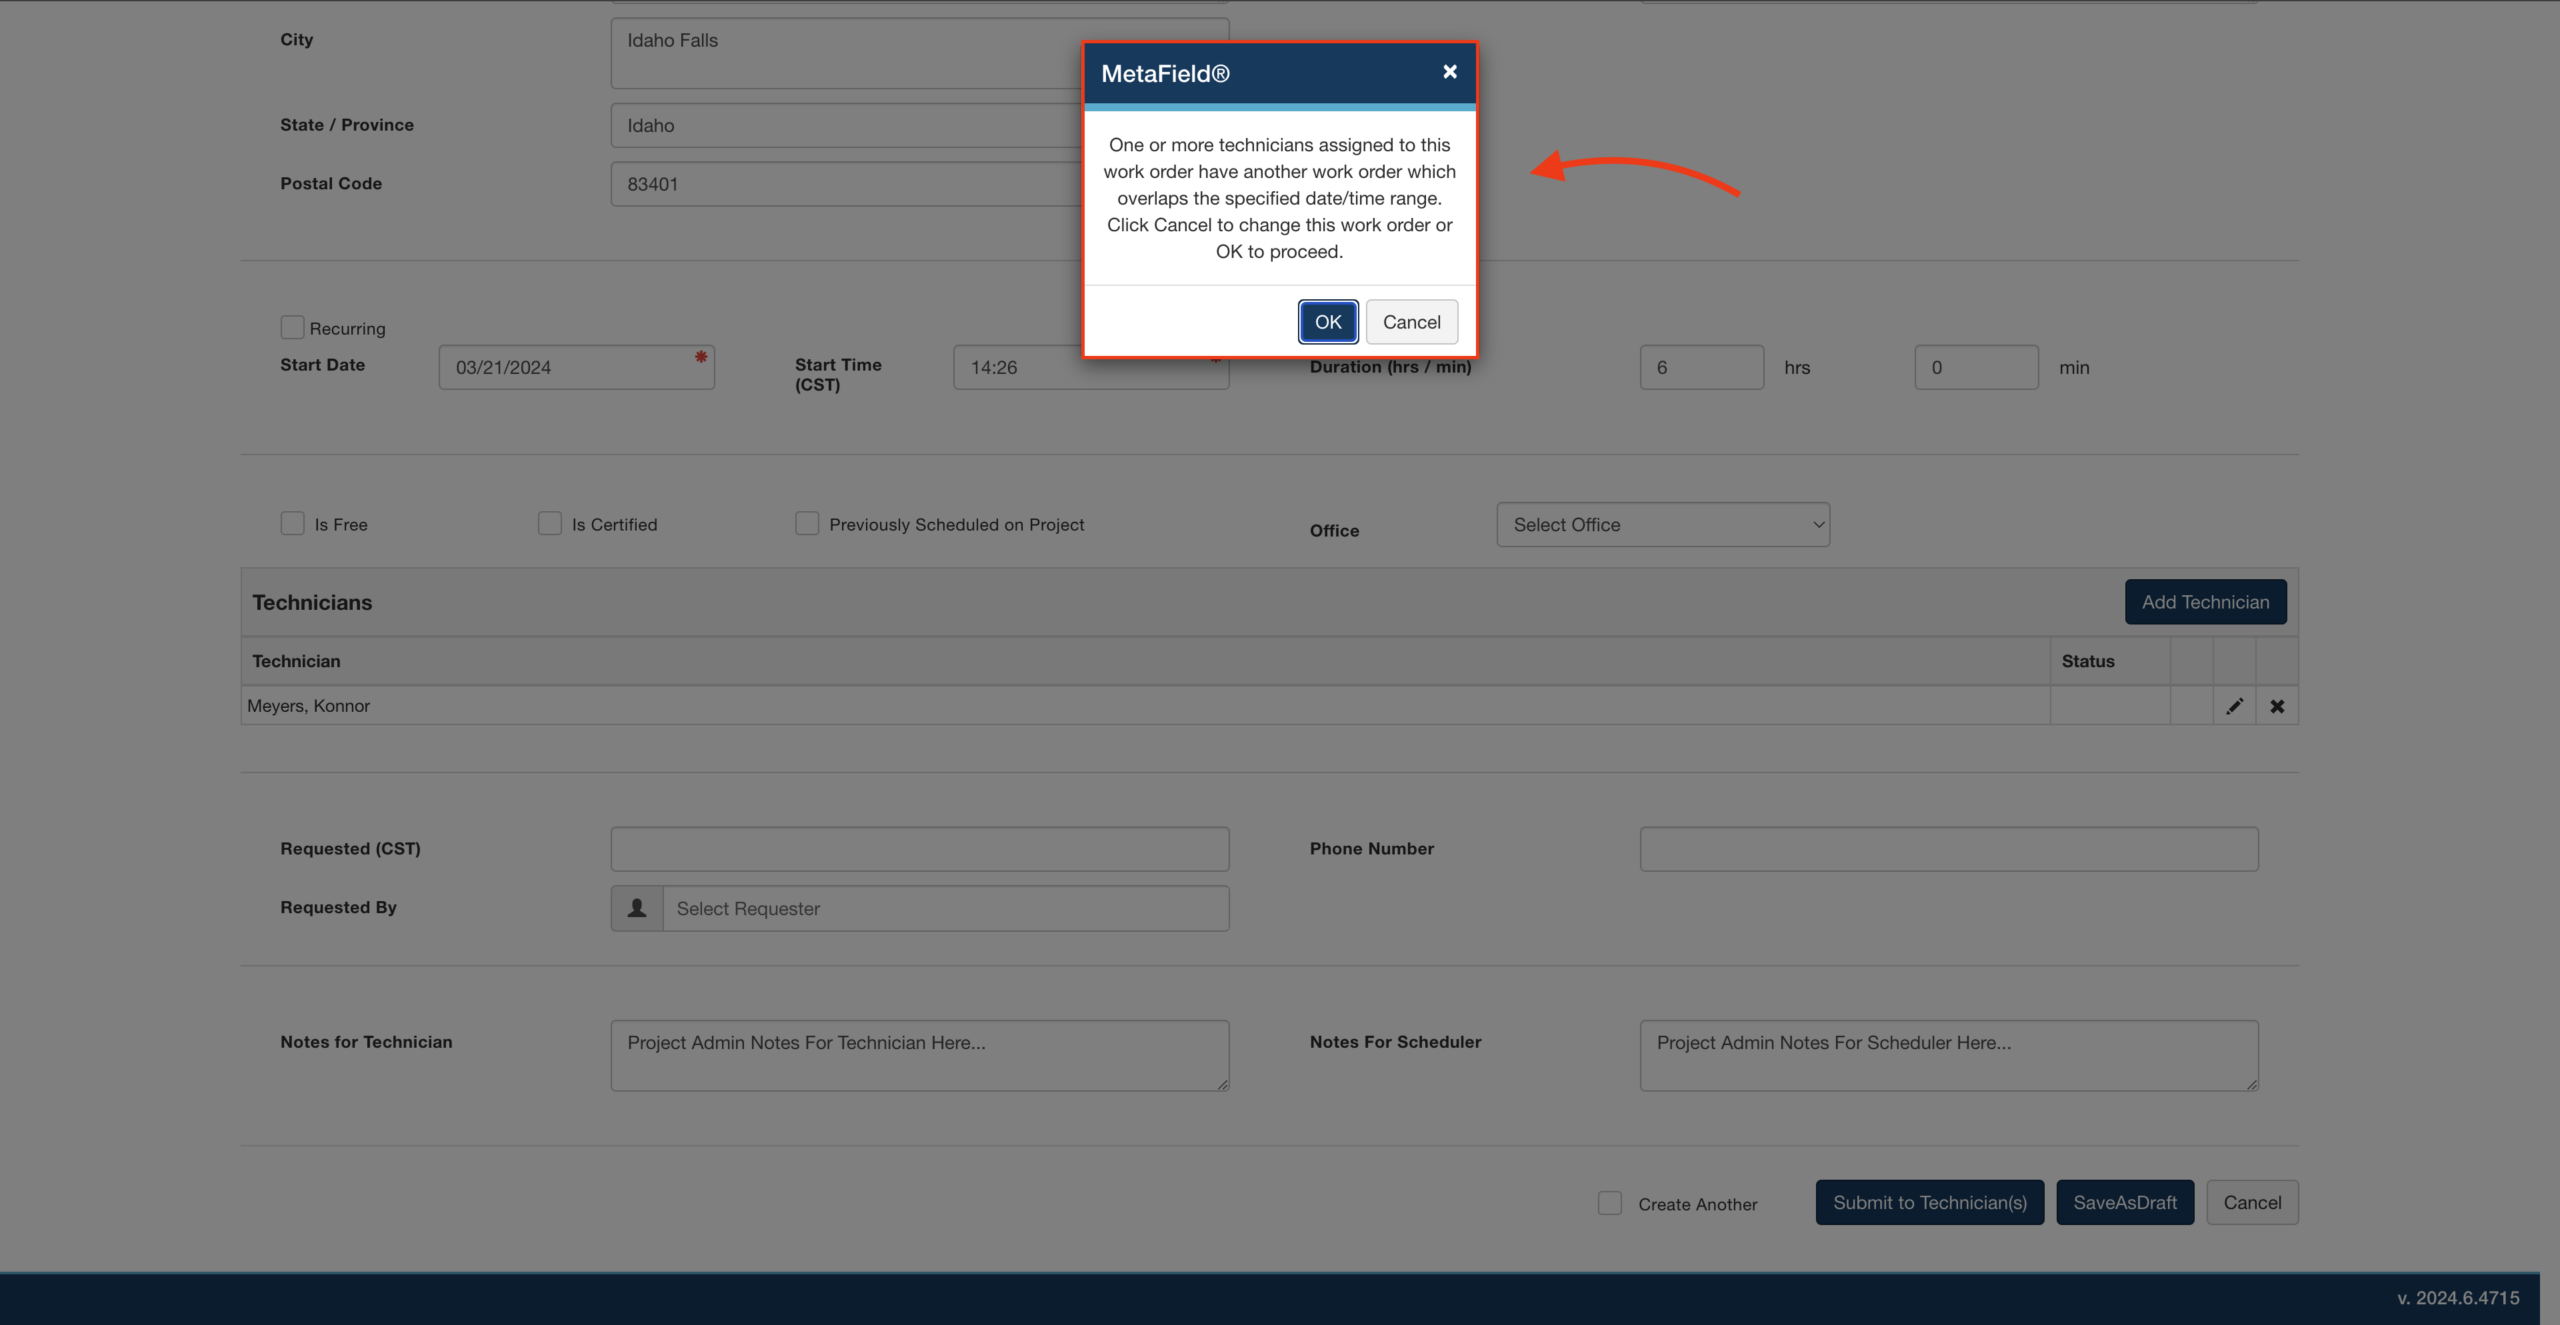
- Technician Double Booked: You assigned a tech to a work order that overlaps with another work order.
- Technician Does Not Have Necessary Certification: You assigned the work order to a tech who lacks required certification(s).
- Technician's Certification Has Expired: You assigned the work order to a tech with expired certifications.
Editing & Copying Work Orders
Once you create a work order, it'll appear on the schedule according to its set Start Date and Start Time:
- Click the work order to open and edit it.
- When editing a recurring work order, you can edit that single instance or the whole series.
- Work orders marked as Complete can no longer be edited.
How to Copy Existing Work Orders
Open the work order and click Copy Work Order. This will copy the contents of the work order, but clear all dates and times. You can copy the work order to the same project or a different one, if required!

Work Order Email Messages
You technicians will receive notifications when work orders are submitted to them. These notifications can be sent via email or text message, depending on the user's settings.
What Changes Will Trigger a Work Order Email Message?
Changes to these fields will trigger an email message:
- Technician (if multiple technicians are assigned or work order is reassigned)
- Start Date / Time
- End Date / Time
- Location
- Address
- City
- Work Items
- Requested By
- Phone Number
- Notes for Technician
- Work Order / Recurrence Number
Deleting a work order that has the Assigned or Accepted status will also notify the technician that the work has been cancelled. However, if you'd like to keep the work order on the calendar for tracking purposes, use the Canceled status instead.
Reassigning a work order to a different technician will notify the original technician that the work order has been reassigned.
Pending Field Actions
Pending Field Actions (PFAs) are events in MetaField that require a follow-up action. For example, if a density test fails in Field, the system will flag it as a PFA in need of a retest. As a scheduler, you'll want to manage these actions by adding new work orders to resolve them.
To access PFAs, click the Pending Field Actions tab in the upper-left:
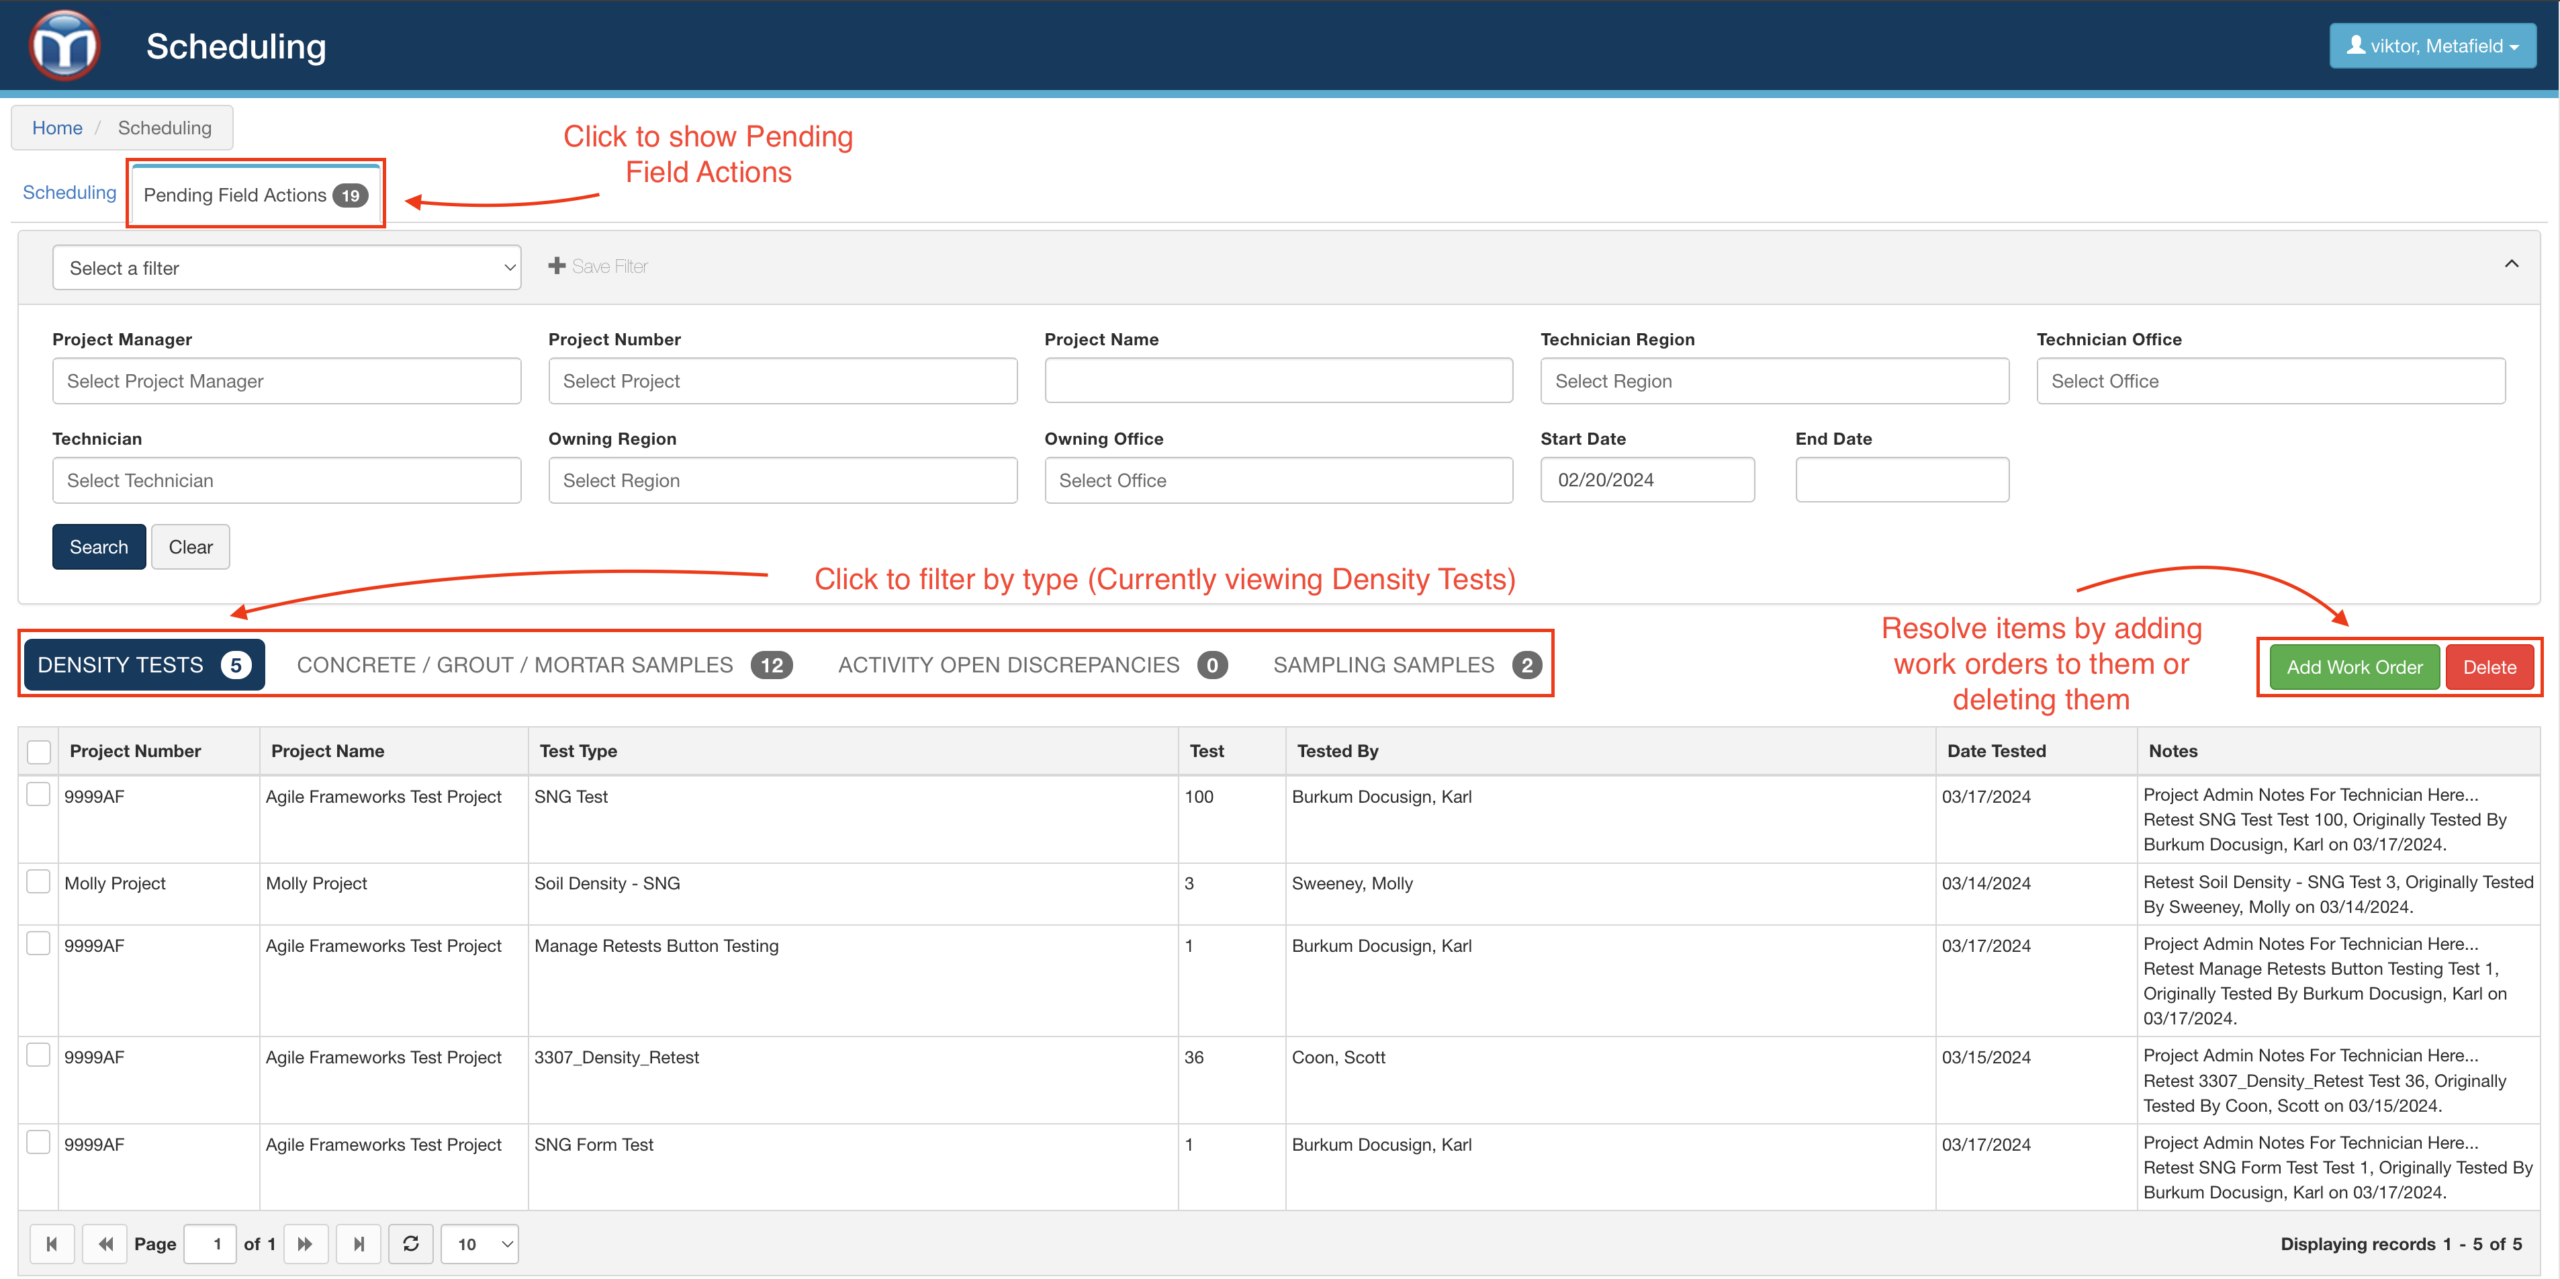
MetaField will automatically create a PFA when certain events occur in the system, like a failed density test being saved. As a scheduler, you can use PFAs to quickly spot and schedule required follow-up work, like a retest or retrieval of a new field specimen.
PFAs are broken up by type into four separate queues. Each queue number shows how many PFAs it holds. Click any queue to open it.

To add a new work order to a PFA, select its checkbox and click Add New Work Order. You can also delete a PFA that's no longer required using the Delete button.
Managing Records & Importing Work Orders
Deleting/Moving Records in Administration
Sometimes, a technician may add records for the incorrect project. These records can often be adjusted (moved to the correct project or deleted) using the Administration area of MetaField.
If a work order is created from a pending field action and the originating action is later moved or deleted, the work order or pending field action will remain unchanged in the system. You will need to manually update these records.
Work Order Import - CSV File Specifications
You can also import work orders into Schedule using CSV files.
Want to keep learning?
Click here for more how-to articles and MetaField guides. You can also access in-app guidance using the Help Desk!